建立書籍表單
本小節介紹如何定義一個頁面/表單來建立Book物件。這比建立等效的Author或Genre頁面要複雜一些,因為我們需要在Book表單中獲取和顯示可用的Author和Genre記錄。
匯入驗證和清理方法
開啟/controllers/bookController.js,並在檔案頂部(路由函式之前)新增以下行。
const { body, validationResult } = require("express-validator");
控制器 - 獲取路由
找到匯出的book_create_get()控制器方法並將其替換為以下程式碼。
// Display book create form on GET.
exports.book_create_get = asyncHandler(async (req, res, next) => {
  // Get all authors and genres, which we can use for adding to our book.
  const [allAuthors, allGenres] = await Promise.all([
    Author.find().sort({ family_name: 1 }).exec(),
    Genre.find().sort({ name: 1 }).exec(),
  ]);

  res.render("book_form", {
    title: "Create Book",
    authors: allAuthors,
    genres: allGenres,
  });
});
這使用await在Promise.all()的結果上獲取所有Author和Genre物件,以並行的方式進行(與Express教程第5部分:顯示庫資料中使用的相同方法)。然後,這些物件作為名為authors和genres的變數(以及頁面title)傳遞給檢視book_form.pug。
控制器 - 釋出路由
找到匯出的book_create_post()控制器方法並將其替換為以下程式碼。
// Handle book create on POST.
exports.book_create_post = [
  // Convert the genre to an array.
  (req, res, next) => {
    if (!Array.isArray(req.body.genre)) {
      req.body.genre =
        typeof req.body.genre === "undefined" ? [] : [req.body.genre];
    }
    next();
  },

  // Validate and sanitize fields.
  body("title", "Title must not be empty.")
    .trim()
    .isLength({ min: 1 })
    .escape(),
  body("author", "Author must not be empty.")
    .trim()
    .isLength({ min: 1 })
    .escape(),
  body("summary", "Summary must not be empty.")
    .trim()
    .isLength({ min: 1 })
    .escape(),
  body("isbn", "ISBN must not be empty").trim().isLength({ min: 1 }).escape(),
  body("genre.*").escape(),
  // Process request after validation and sanitization.

  asyncHandler(async (req, res, next) => {
    // Extract the validation errors from a request.
    const errors = validationResult(req);

    // Create a Book object with escaped and trimmed data.
    const book = new Book({
      title: req.body.title,
      author: req.body.author,
      summary: req.body.summary,
      isbn: req.body.isbn,
      genre: req.body.genre,
    });

    if (!errors.isEmpty()) {
      // There are errors. Render form again with sanitized values/error messages.

      // Get all authors and genres for form.
      const [allAuthors, allGenres] = await Promise.all([
        Author.find().sort({ family_name: 1 }).exec(),
        Genre.find().sort({ name: 1 }).exec(),
      ]);

      // Mark our selected genres as checked.
      for (const genre of allGenres) {
        if (book.genre.includes(genre._id)) {
          genre.checked = "true";
        }
      }
      res.render("book_form", {
        title: "Create Book",
        authors: allAuthors,
        genres: allGenres,
        book: book,
        errors: errors.array(),
      });
    } else {
      // Data from form is valid. Save book.
      await book.save();
      res.redirect(book.url);
    }
  }),
];
此程式碼的結構和行為與Genre和Author表單的POST路由函式幾乎完全相同。首先,我們驗證並清理資料。如果資料無效,我們將重新顯示錶單,以及使用者最初輸入的資料和錯誤訊息列表。如果資料有效,我們將儲存新的Book記錄,並將使用者重定向到書籍詳細資訊頁面。
與其他表單處理程式碼相比,主要區別在於我們如何清理流派資訊。表單返回一個Genre項陣列(而對於其他欄位,它返回一個字串)。為了驗證資訊,我們首先將請求轉換為陣列(這是下一步所需的)。
[
  // Convert the genre to an array.
  (req, res, next) => {
    if (!Array.isArray(req.body.genre)) {
      req.body.genre =
        typeof req.body.genre === "undefined" ? [] : [req.body.genre];
    }
    next();
  },
  // …
];
然後,我們在清理器中使用萬用字元(*)來分別驗證每個流派陣列條目。以下程式碼展示瞭如何實現 - 這相當於“清理鍵為genre下的所有專案”。
[
  // …
  body("genre.*").escape(),
  // …
];
與其他表單處理程式碼相比,最後一個區別是,我們需要將所有現有的流派和作者傳遞給表單。為了標記使用者已選擇的流派,我們遍歷所有流派,併為那些在我們的POST資料中(如以下程式碼片段所示)的流派新增checked="true"引數。
// Mark our selected genres as checked.
for (const genre of allGenres) {
  if (book.genre.includes(genre._id)) {
    genre.checked = "true";
  }
}
檢視
建立/views/book_form.pug,並將以下文字複製到其中。
extends layout

block content
  h1= title

  form(method='POST')
    div.form-group
      label(for='title') Title:
      input#title.form-control(type='text', placeholder='Name of book' name='title' required value=(undefined===book ? '' : book.title) )
    div.form-group
      label(for='author') Author:
      select#author.form-control(name='author' required)
        option(value='') --Please select an author--
        for author in authors
          if book
            if author._id.toString()===book.author._id.toString()
              option(value=author._id selected) #{author.name}
            else
              option(value=author._id) #{author.name}
          else
            option(value=author._id) #{author.name}
    div.form-group
      label(for='summary') Summary:
      textarea#summary.form-control(placeholder='Summary' name='summary' required)= undefined===book ? '' : book.summary
    div.form-group
      label(for='isbn') ISBN:
      input#isbn.form-control(type='text', placeholder='ISBN13' name='isbn' value=(undefined===book ? '' : book.isbn) required)
    div.form-group
      label Genre:
      div
        for genre in genres
          div(style='display: inline; padding-right:10px;')
            if genre.checked
              input.checkbox-input(type='checkbox', name='genre', id=genre._id, value=genre._id, checked)
            else
              input.checkbox-input(type='checkbox', name='genre', id=genre._id, value=genre._id)
            label(for=genre._id)  #{genre.name}
    button.btn.btn-primary(type='submit') Submit

  if errors
    ul
      for error in errors
        li!= error.msg
檢視結構和行為與genre_form.pug模板幾乎相同。
主要區別在於我們如何實現選擇型別欄位:Author和Genre。
- 流派集合顯示為複選框,並使用我們在控制器中設定的
checked值來確定是否應選中該框。 - 作者集合顯示為一個按字母順序排列的單選下拉列表(傳遞給模板的列表已排序,因此我們不需要在模板中進行排序)。如果使用者之前選擇了書籍作者(例如,在初始表單提交後修復無效欄位值或更新書籍詳細資訊時),當顯示錶單時,將重新選擇該作者。在這裡,我們透過將當前作者選項的ID與使用者之前輸入的值(透過
book變數傳遞)進行比較來確定選擇哪個作者。
注意:如果提交的表單中存在錯誤,那麼當表單需要重新渲染時,新書籍作者的ID和現有書籍的作者ID將是Schema.Types.ObjectId型別。因此,要比較它們,我們必須先將它們轉換為字串。
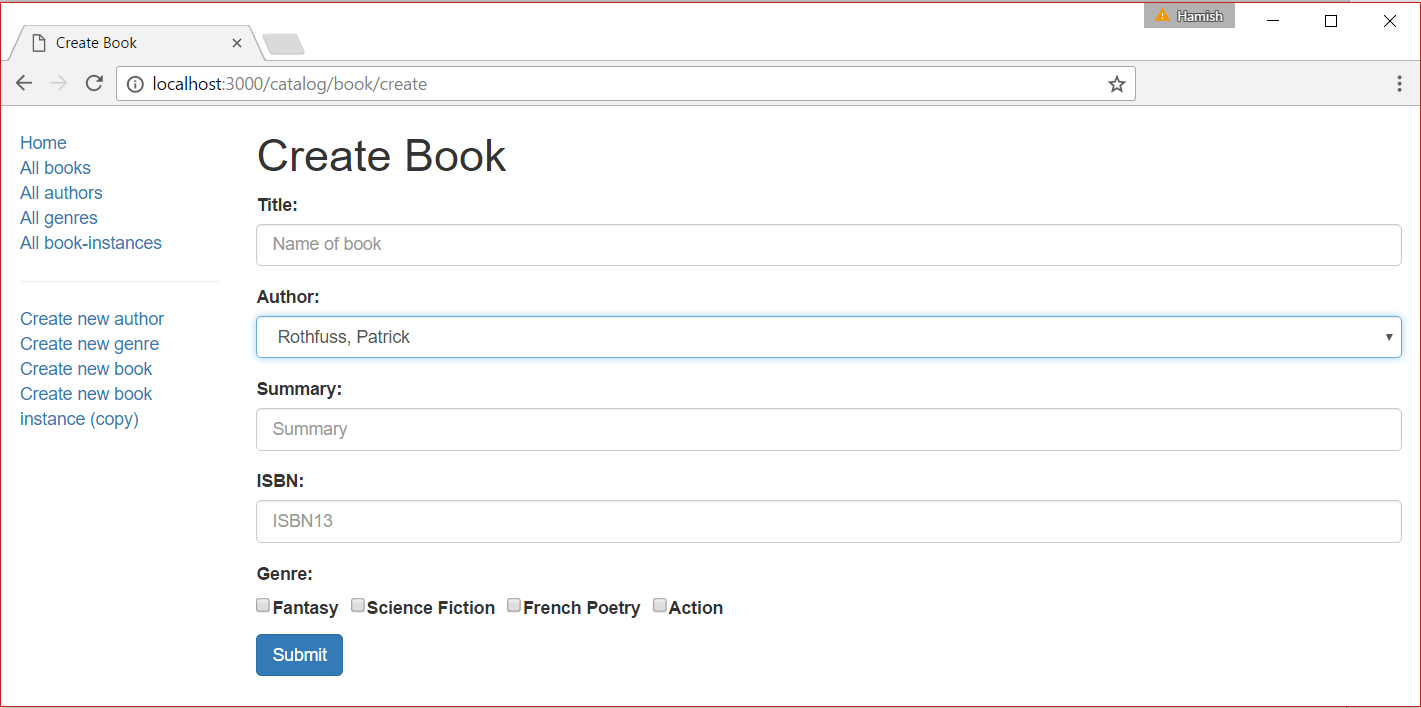
它看起來像什麼?
執行應用程式,在瀏覽器中開啟https://:3000/,然後選擇建立新書籍連結。如果一切設定正確,您的網站應該看起來像以下螢幕截圖。提交有效書籍後,它將被儲存,您將被帶到書籍詳細資訊頁面。
下一步
繼續第6部分的下一小節:建立BookInstance表單.