客戶端儲存
現代 Web 瀏覽器支援網站透過多種方式在使用者的計算機上儲存資料(經使用者許可),並在必要時檢索這些資料。這讓你可以持久儲存資料,儲存網站或文件以供離線使用,保留網站的使用者特定設定等等。本文解釋了這些工作原理的基礎知識。
| 預備知識 | 熟悉 HTML、CSS 和 JavaScript,尤其是 JavaScript 物件基礎知識以及 DOM 指令碼和網路請求等核心 API 知識。 |
|---|---|
| 學習成果 |
|
客戶端儲存?
在 MDN 學習區的其他地方,我們討論了靜態網站和動態網站之間的區別。大多數主要的現代網站都是動態的——它們使用某種資料庫(伺服器端儲存)在伺服器上儲存資料,然後執行伺服器端程式碼來檢索所需資料,將其插入靜態頁面模板,並將生成的 HTML 提供給客戶端以供使用者瀏覽器顯示。
客戶端儲存的工作原理類似,但用途不同。它由 JavaScript API 組成,允許你在客戶端(即使用者機器上)儲存資料,並在需要時檢索它。這有很多不同的用途,例如:
- 個性化網站偏好設定(例如,顯示使用者選擇的自定義小部件、配色方案或字型大小)。
- 持久化之前的網站活動(例如,儲存上次會話的購物車內容,記住使用者是否之前登入過)。
- 在本地儲存資料和資產,使網站下載更快(並且可能更便宜),或者在沒有網路連線的情況下也能使用。
- 在本地儲存 Web 應用程式生成的文件以供離線使用
通常,客戶端和伺服器端儲存會一起使用。例如,你可以下載一批音樂檔案(可能由 Web 遊戲或音樂播放器應用程式使用),將它們儲存在客戶端資料庫中,並根據需要播放。使用者只需下載一次音樂檔案——在後續訪問時,它們將從資料庫中檢索。
注意:使用客戶端儲存 API 儲存的資料量是有限制的(可能針對每個單獨的 API 和累積總量);確切的限制因瀏覽器而異,也可能根據使用者設定而異。有關更多資訊,請參閱瀏覽器儲存配額和逐出標準。
老派:Cookies
客戶端儲存的概念已經存在很長時間了。自 Web 早期以來,網站就一直使用Cookie來儲存資訊,以個性化使用者在網站上的體驗。它們是 Web 上常用最早的客戶端儲存形式。
如今,有更簡單的機制可用於儲存客戶端資料,因此本文中我們不會教你如何使用 Cookie。然而,這並不意味著 Cookie 在現代 Web 上完全無用——它們仍然常用於儲存與使用者個性化和狀態相關的資料,例如會話 ID 和訪問令牌。有關 Cookie 的更多資訊,請參閱我們的使用 HTTP Cookie文章。
新派:Web Storage 和 IndexedDB
我們上面提到的“更簡單”的功能如下:
- Web Storage API 提供了一種機制,用於儲存和檢索較小的資料項,這些資料項由名稱和對應的值組成。當你只需要儲存一些簡單資料時,例如使用者的姓名、他們是否登入、螢幕背景使用的顏色等,這會很有用。
- IndexedDB API 為瀏覽器提供了一個完整的資料庫系統,用於儲存複雜資料。這可以用於從完整的客戶記錄集到音訊或影片檔案等複雜資料型別。
你將在下面瞭解有關這些 API 的更多資訊。
Cache API
Cache API 旨在儲存特定請求的 HTTP 響應,對於儲存網站資產以供離線使用非常有用,這樣網站就可以在沒有網路連線的情況下繼續使用。Cache 通常與Service Worker API結合使用,儘管並非必須如此。
Cache 和 Service Worker 的使用是一個高階主題,我們不會在本文中詳細介紹,但我們會在下面的離線資產儲存部分展示一個示例。
儲存簡單資料 — Web Storage
Web Storage API 使用起來非常簡單——你儲存簡單的資料名稱/值對(僅限於字串、數字等),並在需要時檢索這些值。
基本語法
我們來演示一下
-
首先,在 GitHub 上開啟我們的Web Storage 空模板(在新標籤頁中開啟)。
-
開啟瀏覽器開發者工具的 JavaScript 控制檯。
-
所有 Web Storage 資料都包含在瀏覽器內部的兩個類似物件的結構中:
sessionStorage和localStorage。前者在瀏覽器開啟期間持久儲存資料(瀏覽器關閉時資料丟失),後者即使在瀏覽器關閉後再次開啟也持久儲存資料。本文中我們將使用後者,因為它通常更有用。Storage.setItem()方法允許你將資料項儲存在儲存中——它接受兩個引數:專案的名稱及其值。嘗試在 JavaScript 控制檯中輸入以下內容(如果願意,可以將值更改為你自己的姓名!):jslocalStorage.setItem("name", "Chris"); -
Storage.getItem()方法接受一個引數——你要檢索的資料項的名稱——並返回該項的值。現在在 JavaScript 控制檯中輸入以下行:jslet myName = localStorage.getItem("name"); myName;輸入第二行後,你應該會看到
myName變數現在包含name資料項的值。 -
Storage.removeItem()方法接受一個引數——你要刪除的資料項的名稱——並將該項從 Web 儲存中刪除。在 JavaScript 控制檯中輸入以下行:jslocalStorage.removeItem("name"); myName = localStorage.getItem("name"); myName;第三行現在應該返回
null——name項不再存在於 Web 儲存中。
資料永續性!
Web 儲存的一個關鍵特性是資料在頁面重新載入之間(甚至在瀏覽器關閉後,對於 localStorage 而言)都是持久的。讓我們看看實際效果。
-
再次開啟我們的 Web 儲存空模板,但這次是在你開啟本教程的瀏覽器之外的另一個瀏覽器中!這會更容易操作。
-
在瀏覽器的 JavaScript 控制檯中輸入以下行:
jslocalStorage.setItem("name", "Chris"); let myName = localStorage.getItem("name"); myName;你應該會看到返回的名稱項。
-
現在關閉瀏覽器並重新開啟。
-
再次輸入以下行:
jslet myName = localStorage.getItem("name"); myName;你應該會看到該值仍然可用,即使瀏覽器已經關閉並重新開啟。
每個域的單獨儲存
每個域(瀏覽器中載入的每個單獨的網址)都有一個單獨的資料儲存。你會看到,如果你載入兩個網站(例如 google.com 和 amazon.com)並嘗試在一個網站上儲存一個專案,它將無法供另一個網站使用。
這很有道理——你可以想象如果網站可以互相檢視資料,會產生什麼安全問題!
一個更復雜的例子
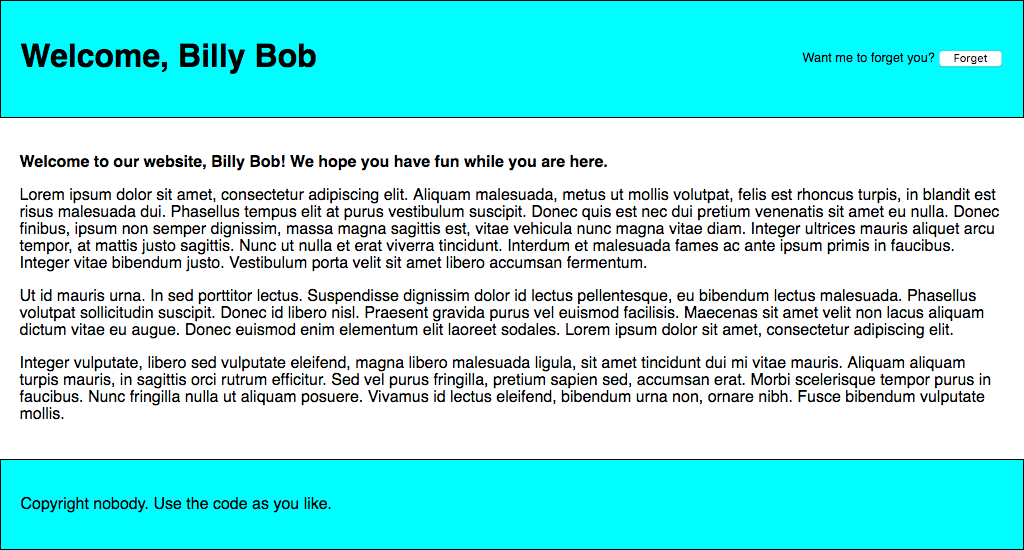
讓我們應用這些新獲得的知識,編寫一個可工作的示例,讓你瞭解 Web 儲存的用法。我們的示例將允許你輸入一個名字,然後頁面會更新以顯示個性化問候語。由於名字儲存在 Web 儲存中,此狀態也會在頁面/瀏覽器重新載入後持久存在。
你可以在 personal-greeting.html 找到示例 HTML — 它包含一個帶有標題、內容和頁尾的網站,以及一個用於輸入你名字的表單。
我們來構建這個例子,這樣你就能理解它是如何工作的。
-
首先,在你的計算機上建立一個新目錄,並將我們的 personal-greeting.html 檔案複製到本地。
-
接下來,請注意我們的 HTML 是如何透過
<script src="index.js" defer></script>這樣的行引用一個名為index.js的 JavaScript 檔案的。我們需要建立它並編寫我們的 JavaScript 程式碼。在與 HTML 檔案相同的目錄中建立一個index.js檔案。 -
我們首先建立對本例中需要操作的所有 HTML 功能的引用——我們將它們都建立為常量,因為這些引用在應用程式的生命週期中不需要更改。將以下行新增到你的 JavaScript 檔案中:
js// create needed constants const rememberDiv = document.querySelector(".remember"); const forgetDiv = document.querySelector(".forget"); const form = document.querySelector("form"); const nameInput = document.querySelector("#entername"); const submitBtn = document.querySelector("#submitname"); const forgetBtn = document.querySelector("#forgetname"); const h1 = document.querySelector("h1"); const personalGreeting = document.querySelector(".personal-greeting"); -
接下來,我們需要新增一個小的事件監聽器,以阻止表單在提交按鈕被按下時實際提交,因為這不是我們想要的行為。將此程式碼片段新增到你之前的程式碼下方:
js// Stop the form from submitting when a button is pressed form.addEventListener("submit", (e) => e.preventDefault()); -
現在我們需要新增一個事件監聽器,它的處理函式將在“打招呼”按鈕被點選時執行。註釋詳細解釋了每個部分的具體作用,但本質上,我們正在獲取使用者在文字輸入框中輸入的名稱,並使用
setItem()將其儲存在 Web 儲存中,然後執行一個名為nameDisplayCheck()的函式,該函式將負責更新實際的網站文字。將此新增到你的程式碼底部:js// run function when the 'Say hello' button is clicked submitBtn.addEventListener("click", () => { // store the entered name in web storage localStorage.setItem("name", nameInput.value); // run nameDisplayCheck() to sort out displaying the personalized greetings and updating the form display nameDisplayCheck(); }); -
此時,我們還需要一個事件處理程式,用於在“忘記”按鈕被點選時執行一個函式——此按鈕僅在“打招呼”按鈕被點選後顯示(這兩個表單狀態來回切換)。在此函式中,我們使用
removeItem()從 Web 儲存中刪除name項,然後再次執行nameDisplayCheck()來更新顯示。將此新增到底部:js// run function when the 'Forget' button is clicked forgetBtn.addEventListener("click", () => { // Remove the stored name from web storage localStorage.removeItem("name"); // run nameDisplayCheck() to sort out displaying the generic greeting again and updating the form display nameDisplayCheck(); }); -
現在是時候定義
nameDisplayCheck()函式本身了。在這裡,我們透過將localStorage.getItem('name')作為條件測試來檢查名稱項是否已儲存在 Web 儲存中。如果名稱已儲存,此呼叫將評估為true;否則,此呼叫將評估為false。如果呼叫評估為true,我們顯示個性化問候語,顯示錶單的“忘記”部分,並隱藏表單的“打招呼”部分。如果呼叫評估為false,我們顯示通用問候語並執行相反的操作。同樣,將以下程式碼放在底部:js// define the nameDisplayCheck() function function nameDisplayCheck() { // check whether the 'name' data item is stored in web Storage if (localStorage.getItem("name")) { // If it is, display personalized greeting const name = localStorage.getItem("name"); h1.textContent = `Welcome, ${name}`; personalGreeting.textContent = `Welcome to our website, ${name}! We hope you have fun while you are here.`; // hide the 'remember' part of the form and show the 'forget' part forgetDiv.style.display = "block"; rememberDiv.style.display = "none"; } else { // if not, display generic greeting h1.textContent = "Welcome to our website "; personalGreeting.textContent = "Welcome to our website. We hope you have fun while you are here."; // hide the 'forget' part of the form and show the 'remember' part forgetDiv.style.display = "none"; rememberDiv.style.display = "block"; } } -
最後但同樣重要的是,我們需要在頁面載入時執行
nameDisplayCheck()函式。如果我們不這樣做,那麼個性化問候語將不會在頁面重新載入時持久化。將以下內容新增到你的程式碼底部:jsnameDisplayCheck();
你的示例已完成——幹得好!現在只剩下儲存程式碼並在瀏覽器中測試你的 HTML 頁面了。你可以在此處檢視我們完成的版本正在執行。
注意:在使用 Web Storage API 還有一個稍微複雜一點的例子可以探索。
注意:在我們完成版本的原始碼中,<script src="index.js" defer></script> 行中的 defer 屬性指定 <script> 元素的內容將不會在頁面載入完成之前執行。
儲存複雜資料 — IndexedDB
IndexedDB API(有時簡稱 IDB)是瀏覽器中一個完整的資料庫系統,你可以在其中儲存複雜的關聯資料,其型別不限於字串或數字等簡單值。你可以在 IndexedDB 例項中儲存影片、影像以及幾乎任何其他內容。
IndexedDB API 允許你建立一個數據庫,然後在該資料庫中建立物件儲存。物件儲存類似於關係資料庫中的表,每個物件儲存可以包含多個物件。要了解有關 IndexedDB API 的更多資訊,請參閱使用 IndexedDB。
然而,這也付出了代價:IndexedDB 的使用比 Web Storage API 複雜得多。在本節中,我們只會淺嘗輒止地介紹它的功能,但我們將為你提供足夠的入門知識。
透過一個筆記儲存示例
在這裡,我們將為你介紹一個示例,它允許你在瀏覽器中儲存筆記,並隨時檢視和刪除它們,讓你自己構建它,並在此過程中解釋 IDB 最基本的部分。
這個應用程式看起來像這樣:
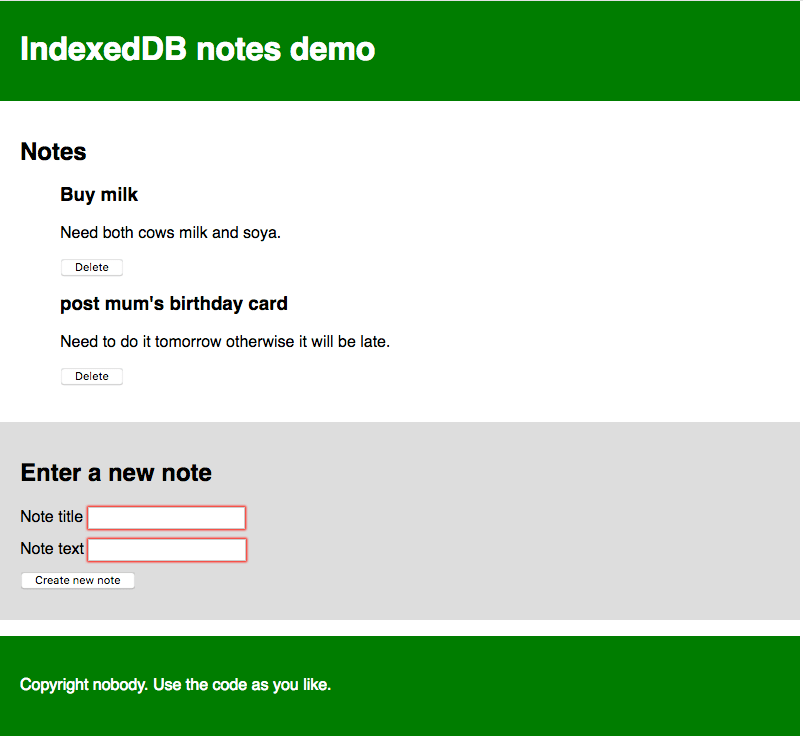
每條筆記都有標題和正文,並且都可以單獨編輯。我們將在下面介紹的 JavaScript 程式碼包含詳細的註釋,以幫助你理解正在發生的事情。
入門
- 首先,將我們的
index.html、style.css和index-start.js檔案複製到你本地計算機上的一個新目錄中。 - 看一下這些檔案。你會看到 HTML 定義了一個帶有頁首和頁尾的網站,以及一個主內容區域,其中包含一個用於顯示筆記的地方,以及一個用於向資料庫輸入新筆記的表單。CSS 提供了一些樣式,使其更清晰。JavaScript 檔案包含五個宣告的常量,其中包含對將顯示筆記的
<ul>元素、標題和正文<input>元素、<form>本身以及<button>的引用。 - 將你的 JavaScript 檔案重新命名為
index.js。現在你可以開始向其中新增程式碼了。
資料庫初始設定
現在讓我們看看我們首先需要做什麼來實際設定一個數據庫。
-
在常量宣告下方,新增以下行:
js// Create an instance of a db object for us to store the open database in let db;在這裡,我們聲明瞭一個名為
db的變數——它稍後將用於儲存表示我們資料庫的物件。我們將在多個地方使用它,因此我們在此處將其全域性宣告,以方便操作。 -
接下來,新增以下內容:
js// Open our database; it is created if it doesn't already exist // (see the upgradeneeded handler below) const openRequest = window.indexedDB.open("notes_db", 1);此行建立了一個請求,用於開啟名為
notes_db的資料庫的第1版。如果此資料庫尚不存在,後續程式碼將為你建立它。你將經常在 IndexedDB 中看到這種請求模式。資料庫操作需要時間。你不想在等待結果時掛起瀏覽器,因此資料庫操作是非同步的,這意味著它們不會立即發生,而是在將來的某個時間點發生,並在完成後通知你。為了在 IndexedDB 中處理這個問題,你建立一個請求物件(可以命名為你喜歡的任何名稱——我們在此處將其命名為
openRequest,這樣它的作用就很明顯了)。然後,你使用事件處理程式在請求完成、失敗等情況下執行程式碼,這將在下面看到。注意: 版本號很重要。如果你想升級你的資料庫(例如,透過更改表結構),你必須使用增加的版本號,在
upgradeneeded處理程式中指定不同的模式(見下文),等等,再次執行你的程式碼。本教程不涉及資料庫升級。 -
現在,在你之前的新增程式碼下方,新增以下事件處理程式:
js// error handler signifies that the database didn't open successfully openRequest.addEventListener("error", () => console.error("Database failed to open"), ); // success handler signifies that the database opened successfully openRequest.addEventListener("success", () => { console.log("Database opened successfully"); // Store the opened database object in the db variable. This is used a lot below db = openRequest.result; // Run the displayData() function to display the notes already in the IDB displayData(); });如果系統返回請求失敗,則會執行
error事件處理程式。這允許你響應此問題。在我們的示例中,我們只是在 JavaScript 控制檯中列印一條訊息。如果請求成功返回,則會執行
success事件處理程式,這意味著資料庫已成功開啟。如果發生這種情況,一個表示已開啟資料庫的物件將透過openRequest.result屬性可用,允許我們操作資料庫。我們將其儲存在我們之前建立的db變數中以供以後使用。我們還會執行一個名為displayData()的函式,該函式將資料庫中的資料顯示在<ul>中。我們現在執行它,以便在頁面載入後立即顯示資料庫中已有的筆記。你將在後面看到displayData()的定義。 -
最後,對於本節,我們將新增可能是設定資料庫最重要的事件處理程式:
upgradeneeded。如果資料庫尚未設定,或者如果資料庫以比現有儲存資料庫更大的版本號開啟(執行升級時),則會執行此處理程式。在你之前的處理程式下方新增以下程式碼:js// Set up the database tables if this has not already been done openRequest.addEventListener("upgradeneeded", (e) => { // Grab a reference to the opened database db = e.target.result; // Create an objectStore in our database to store notes and an auto-incrementing key // An objectStore is similar to a 'table' in a relational database const objectStore = db.createObjectStore("notes_os", { keyPath: "id", autoIncrement: true, }); // Define what data items the objectStore will contain objectStore.createIndex("title", "title", { unique: false }); objectStore.createIndex("body", "body", { unique: false }); console.log("Database setup complete"); });這就是我們定義資料庫模式(結構)的地方;也就是說,它包含的列(或欄位)集。在這裡,我們首先從事件目標的
result屬性(e.target.result)獲取對現有資料庫的引用,該屬性是request物件。這等同於success事件處理程式中的db = openRequest.result;行,但我們在這裡需要單獨執行此操作,因為upgradeneeded事件處理程式(如果需要)將在success事件處理程式之前執行,這意味著如果我們不這樣做,db值將不可用。然後,我們使用
IDBDatabase.createObjectStore()在我們開啟的資料庫中建立一個名為notes_os的新物件儲存。這相當於傳統資料庫系統中的單個表。我們給它命名為 notes,並指定了一個名為id的autoIncrement鍵欄位——在每個新記錄中,它將自動獲得一個遞增值——開發人員無需顯式設定。作為鍵,id欄位將用於唯一標識記錄,例如在刪除或顯示記錄時。我們還使用
IDBObjectStore.createIndex()方法建立了另外兩個索引(欄位):title(將包含每個筆記的標題)和body(將包含筆記的正文文字)。
因此,設定好這個資料庫模式後,當我們開始向資料庫新增記錄時,每條記錄都將表示為一個物件,其結構大致如下:
{
  "title": "Buy milk",
  "body": "Need both cows milk and soy.",
  "id": 8
}
向資料庫新增資料
現在讓我們看看如何向資料庫新增記錄。這將透過我們頁面上的表單來完成。
在你之前的事件處理程式下方,新增以下行,它設定了一個 submit 事件處理程式,當表單提交時(當提交<button>被按下導致表單成功提交時),會執行一個名為 addData() 的函式:
// Create a submit event handler so that when the form is submitted the addData() function is run
form.addEventListener("submit", addData);
現在我們來定義 addData() 函式。在上一行下方新增此程式碼:
// Define the addData() function
function addData(e) {
  // prevent default - we don't want the form to submit in the conventional way
  e.preventDefault();

  // grab the values entered into the form fields and store them in an object ready for being inserted into the DB
  const newItem = { title: titleInput.value, body: bodyInput.value };

  // open a read/write db transaction, ready for adding the data
  const transaction = db.transaction(["notes_os"], "readwrite");

  // call an object store that's already been added to the database
  const objectStore = transaction.objectStore("notes_os");

  // Make a request to add our newItem object to the object store
  const addRequest = objectStore.add(newItem);

  addRequest.addEventListener("success", () => {
    // Clear the form, ready for adding the next entry
    titleInput.value = "";
    bodyInput.value = "";
  });

  // Report on the success of the transaction completing, when everything is done
  transaction.addEventListener("complete", () => {
    console.log("Transaction completed: database modification finished.");

    // update the display of data to show the newly added item, by running displayData() again.
    displayData();
  });

  transaction.addEventListener("error", () =>
    console.log("Transaction not opened due to error"),
  );
}
這相當複雜;分解來看,我們:
- 在事件物件上執行
Event.preventDefault(),以阻止表單以傳統方式實際提交(這會導致頁面重新整理並破壞使用者體驗)。 - 建立一個物件,表示要輸入資料庫的記錄,並使用表單輸入的值填充它。請注意,我們不必顯式包含
id值——正如我們之前解釋的,它是自動填充的。 - 使用
IDBDatabase.transaction()方法針對notes_os物件儲存開啟一個readwrite事務。此事務物件允許我們訪問物件儲存,以便我們可以對其執行操作,例如新增新記錄。 - 使用
IDBTransaction.objectStore()方法訪問物件儲存,並將結果儲存在objectStore變數中。 - 使用
IDBObjectStore.add()將新記錄新增到資料庫。這會建立一個請求物件,方式與我們之前看到的相同。 - 向
request和transaction物件新增一堆事件處理程式,以便在生命週期的關鍵點執行程式碼。請求成功後,我們清空表單輸入以準備輸入下一條筆記。事務完成後,我們再次執行displayData()函式以更新頁面上筆記的顯示。
顯示資料
我們已經在程式碼中兩次引用了 displayData(),所以我們最好定義它。將其新增到你的程式碼中,放在之前的函式定義下方:
// Define the displayData() function
function displayData() {
  // Here we empty the contents of the list element each time the display is updated
  // If you didn't do this, you'd get duplicates listed each time a new note is added
  while (list.firstChild) {
    list.removeChild(list.firstChild);
  }

  // Open our object store and then get a cursor - which iterates through all the
  // different data items in the store
  const objectStore = db.transaction("notes_os").objectStore("notes_os");
  objectStore.openCursor().addEventListener("success", (e) => {
    // Get a reference to the cursor
    const cursor = e.target.result;

    // If there is still another data item to iterate through, keep running this code
    if (cursor) {
      // Create a list item, h3, and p to put each data item inside when displaying it
      // structure the HTML fragment, and append it inside the list
      const listItem = document.createElement("li");
      const h3 = document.createElement("h3");
      const para = document.createElement("p");

      listItem.appendChild(h3);
      listItem.appendChild(para);
      list.appendChild(listItem);

      // Put the data from the cursor inside the h3 and para
      h3.textContent = cursor.value.title;
      para.textContent = cursor.value.body;

      // Store the ID of the data item inside an attribute on the listItem, so we know
      // which item it corresponds to. This will be useful later when we want to delete items
      listItem.setAttribute("data-note-id", cursor.value.id);

      // Create a button and place it inside each listItem
      const deleteBtn = document.createElement("button");
      listItem.appendChild(deleteBtn);
      deleteBtn.textContent = "Delete";

      // Set an event handler so that when the button is clicked, the deleteItem()
      // function is run
      deleteBtn.addEventListener("click", deleteItem);

      // Iterate to the next item in the cursor
      cursor.continue();
    } else {
      // Again, if list item is empty, display a 'No notes stored' message
      if (!list.firstChild) {
        const listItem = document.createElement("li");
        listItem.textContent = "No notes stored.";
        list.appendChild(listItem);
      }
      // if there are no more cursor items to iterate through, say so
      console.log("Notes all displayed");
    }
  });
}
再次,我們來分解一下:
- 首先,我們清空
<ul>元素的內容,然後再用更新後的內容填充它。如果你不這樣做,每次更新都會導致大量重複內容被新增到列表中。 - 接下來,我們使用
IDBDatabase.transaction()和IDBTransaction.objectStore()獲取對notes_os物件儲存的引用,就像我們在addData()中所做的那樣,只不過這裡我們將它們連結在一行中。 - 下一步是使用
IDBObjectStore.openCursor()方法開啟一個遊標請求——這是一個可用於遍歷物件儲存中記錄的構造。我們在此行末尾鏈上一個success事件處理程式,以使程式碼更簡潔——當遊標成功返回時,處理程式就會執行。 - 我們使用
const cursor = e.target.result獲取對遊標本身(一個IDBCursor物件)的引用。 - 接下來,我們檢查遊標是否包含資料儲存中的記錄(
if (cursor){ })——如果是,我們建立一個 DOM 片段,用記錄中的資料填充它,並將其插入頁面(在<ul>元素內)。我們還包含一個刪除按鈕,單擊該按鈕時,將透過執行deleteItem()函式刪除該筆記,我們將在下一節中檢視該函式。 - 在
if塊的末尾,我們使用IDBCursor.continue()方法將遊標推進到資料儲存中的下一條記錄,並再次執行if塊的內容。如果還有下一條記錄可以迭代,這將導致它被插入頁面,然後再次執行continue(),依此類推。 - 當沒有更多記錄可迭代時,
cursor將返回undefined,因此將執行else塊而不是if塊。此塊檢查是否有任何筆記插入到<ul>中——如果沒有,它會插入一條訊息,表示沒有儲存筆記。
刪除筆記
如上所述,當按下筆記的刪除按鈕時,筆記將被刪除。這透過 deleteItem() 函式實現,該函式如下所示:
// Define the deleteItem() function
function deleteItem(e) {
  // retrieve the name of the task we want to delete. We need
  // to convert it to a number before trying to use it with IDB; IDB key
  // values are type-sensitive.
  const noteId = Number(e.target.parentNode.getAttribute("data-note-id"));

  // open a database transaction and delete the task, finding it using the id we retrieved above
  const transaction = db.transaction(["notes_os"], "readwrite");
  const objectStore = transaction.objectStore("notes_os");
  const deleteRequest = objectStore.delete(noteId);

  // report that the data item has been deleted
  transaction.addEventListener("complete", () => {
    // delete the parent of the button
    // which is the list item, so it is no longer displayed
    e.target.parentNode.parentNode.removeChild(e.target.parentNode);
    console.log(`Note ${noteId} deleted.`);

    // Again, if list item is empty, display a 'No notes stored' message
    if (!list.firstChild) {
      const listItem = document.createElement("li");
      listItem.textContent = "No notes stored.";
      list.appendChild(listItem);
    }
  });
}
- 這第一部分需要一些解釋——我們使用
Number(e.target.parentNode.getAttribute('data-note-id'))檢索要刪除的記錄的 ID——回想一下,記錄的 ID 在首次顯示時儲存在<li>上的data-note-id屬性中。但是,我們需要透過全域性內建的Number()物件傳遞屬性,因為它是字串資料型別,因此資料庫無法識別它,資料庫期望的是一個數字。 - 然後我們使用之前看到的相同模式獲取對物件儲存的引用,並使用
IDBObjectStore.delete()方法從資料庫中刪除記錄,並傳入其 ID。 - 當資料庫事務完成時,我們從 DOM 中刪除筆記的
<li>,並再次檢查<ul>是否為空,並酌情插入一條筆記。
就是這樣了!你的示例現在應該可以工作了。
透過 IndexedDB 儲存複雜資料
如上所述,IndexedDB 不僅僅可以儲存文字字串。你可以儲存幾乎任何你想要的內容,包括影片或影像 blob 等複雜物件。實現起來也並不比其他型別的資料困難多少。
為了演示如何做到這一點,我們編寫了另一個示例,名為IndexedDB 影片儲存(此處也可檢視其線上執行)。當你首次執行該示例時,它會從網路下載所有影片,將它們儲存在 IndexedDB 資料庫中,然後將影片顯示在 UI 的<video>元素中。當你第二次執行它時,它會從資料庫中查詢影片並從中獲取它們,然後再顯示——這使得後續載入更快,頻寬消耗更少。
我們來看看這個例子中最有趣的部分。我們不會全部看一遍——很多地方都與上一個例子相似,而且程式碼註釋也很詳細。
-
對於這個例子,我們將要獲取的影片名稱儲存在一個物件陣列中:
jsconst videos = [ { name: "crystal" }, { name: "elf" }, { name: "frog" }, { name: "monster" }, { name: "pig" }, { name: "rabbit" }, ]; -
首先,資料庫成功開啟後,我們執行一個
init()函式。該函式遍歷不同的影片名稱,嘗試從videos資料庫載入由每個名稱標識的記錄。如果每個影片都在資料庫中找到(透過檢查
request.result是否評估為true來判斷——如果記錄不存在,它將為undefined),其影片檔案(以 blob 形式儲存)和影片名稱將直接傳遞給displayVideo()函式以將其放置在 UI 中。如果未找到,影片名稱將傳遞給fetchVideoFromNetwork()函式,你猜對了,就是從網路中獲取影片。jsfunction init() { // Loop through the video names one by one for (const video of videos) { // Open transaction, get object store, and get() each video by name const objectStore = db.transaction("videos_os").objectStore("videos_os"); const request = objectStore.get(video.name); request.addEventListener("success", () => { // If the result exists in the database (is not undefined) if (request.result) { // Grab the videos from IDB and display them using displayVideo() console.log("taking videos from IDB"); displayVideo( request.result.mp4, request.result.webm, request.result.name, ); } else { // Fetch the videos from the network fetchVideoFromNetwork(video); } }); } } -
以下程式碼片段取自
fetchVideoFromNetwork()內部——在這裡,我們使用兩個獨立的fetch()請求獲取影片的 MP4 和 WebM 版本。然後,我們使用Response.blob()方法將每個響應的主體提取為 blob,從而獲得影片的物件表示,以便稍後儲存和顯示。然而,這裡我們有一個問題——這兩個請求都是非同步的,但我們只希望在兩個 Promise 都兌現後才嘗試顯示或儲存影片。幸運的是,有一個內建方法可以處理此類問題——
Promise.all()。它接受一個引數——對你想要檢查兌現的所有單個 Promise 的引用,這些引用放在一個數組中——並返回一個 Promise,該 Promise 在所有單個 Promise 都兌現時兌現。在此 Promise 的
then()處理程式內部,我們像以前一樣呼叫displayVideo()函式以在 UI 中顯示影片,然後我們還呼叫storeVideo()函式以將這些影片儲存在資料庫中。js// Fetch the MP4 and WebM versions of the video using the fetch() function, // then expose their response bodies as blobs const mp4Blob = fetch(`videos/${video.name}.mp4`).then((response) => response.blob(), ); const webmBlob = fetch(`videos/${video.name}.webm`).then((response) => response.blob(), ); // Only run the next code when both promises have fulfilled Promise.all([mp4Blob, webmBlob]).then((values) => { // display the video fetched from the network with displayVideo() displayVideo(values[0], values[1], video.name); // store it in the IDB using storeVideo() storeVideo(values[0], values[1], video.name); }); -
我們首先來看
storeVideo()。這與你在上一個示例中看到的向資料庫新增資料的模式非常相似——我們開啟一個readwrite事務並獲取對我們videos_os物件儲存的引用,建立一個表示要新增到資料庫的記錄的物件,然後使用IDBObjectStore.add()新增它。js// Define the storeVideo() function function storeVideo(mp4, webm, name) { // Open transaction, get object store; make it a readwrite so we can write to the IDB const objectStore = db .transaction(["videos_os"], "readwrite") .objectStore("videos_os"); // Add the record to the IDB using add() const request = objectStore.add({ mp4, webm, name }); request.addEventListener("success", () => console.log("Record addition attempt finished"), ); request.addEventListener("error", () => console.error(request.error)); } -
最後,我們有
displayVideo(),它建立在 UI 中插入影片所需的 DOM 元素,然後將它們附加到頁面。其中最有趣的部分是下面顯示的部分——要實際在<video>元素中顯示我們的影片 blob,我們需要使用URL.createObjectURL()方法建立物件 URL(指向儲存在記憶體中的影片 blob 的內部 URL)。完成後,我們可以將物件 URL 設定為我們<source>元素的src屬性的值,它就可以正常工作了。js// Define the displayVideo() function function displayVideo(mp4Blob, webmBlob, title) { // Create object URLs out of the blobs const mp4URL = URL.createObjectURL(mp4Blob); const webmURL = URL.createObjectURL(webmBlob); // Create DOM elements to embed video in the page const article = document.createElement("article"); const h2 = document.createElement("h2"); h2.textContent = title; const video = document.createElement("video"); video.controls = true; const source1 = document.createElement("source"); source1.src = mp4URL; source1.type = "video/mp4"; const source2 = document.createElement("source"); source2.src = webmURL; source2.type = "video/webm"; // Embed DOM elements into page section.appendChild(article); article.appendChild(h2); article.appendChild(video); video.appendChild(source1); video.appendChild(source2); }
離線資產儲存
上述示例已經展示瞭如何建立一個應用程式,它將大型資產儲存在 IndexedDB 資料庫中,從而避免了多次下載的需求。這已經極大地改善了使用者體驗,但仍然缺少一件事——每次訪問網站時,主 HTML、CSS 和 JavaScript 檔案仍然需要下載,這意味著在沒有網路連線時它將無法工作。
這就是Service Worker和密切相關的Cache API發揮作用的地方。
Service Worker 是一個 JavaScript 檔案,當瀏覽器訪問特定源(網站,或某個域下網站的一部分)時,它會針對該源進行註冊。註冊後,它可以控制該源下的頁面。它透過位於載入頁面和網路之間,並攔截針對該源的網路請求來實現這一點。
當它攔截到一個請求時,它可以執行任何你希望的操作(參見用例設想),但經典的例子是離線儲存網路響應,然後提供這些響應來代替來自網路的響應。實際上,它允許你使網站完全離線工作。
Cache API 是另一種客戶端儲存機制,但有所不同——它旨在儲存 HTTP 響應,因此與 Service Worker 配合得非常好。
Service Worker 示例
讓我們看一個例子,讓你對這可能是什麼樣子有個大致瞭解。我們建立了上一節中影片儲存示例的另一個版本——它的功能完全相同,但它也透過 Service Worker 將 HTML、CSS 和 JavaScript 儲存到 Cache API 中,從而允許該示例離線執行!
檢視帶有 Service Worker 的 IndexedDB 影片儲存線上執行,以及原始碼。
註冊 Service Worker
首先要注意的是,主 JavaScript 檔案中有一段額外的程式碼(參見 index.js)。首先,我們進行特性檢測,以檢視 Navigator 物件中是否提供了 serviceWorker 成員。如果返回 true,則我們知道至少支援 Service Worker 的基本功能。在這裡,我們使用 ServiceWorkerContainer.register() 方法註冊一個包含在 sw.js 檔案中的 Service Worker,使其針對其所在源進行註冊,這樣它就可以控制與它位於同一目錄或子目錄中的頁面。當其 Promise fulfilled 時,Service Worker 被視為已註冊。
// Register service worker to control making site work offline
if ("serviceWorker" in navigator) {
  navigator.serviceWorker
    .register(
      "/learning-area/javascript/apis/client-side-storage/cache-sw/video-store-offline/sw.js",
    )
    .then(() => console.log("Service Worker Registered"));
}
注意: sw.js 檔案的給定路徑是相對於網站源的,而不是包含程式碼的 JavaScript 檔案。Service Worker 位於 https://mdn.github.io/learning-area/javascript/apis/client-side-storage/cache-sw/video-store-offline/sw.js。源是 https://mdn.github.io,因此給定的路徑必須是 /learning-area/javascript/apis/client-side-storage/cache-sw/video-store-offline/sw.js。如果你想將此示例託管在你自己的伺服器上,則必須相應地更改此路徑。這相當令人困惑,但出於安全原因必須這樣做。
安裝 Service Worker
下一次訪問 Service Worker 控制的任何頁面時(例如,當示例重新載入時),Service Worker 將針對該頁面安裝,這意味著它將開始控制該頁面。當這種情況發生時,將向 Service Worker 觸發一個 install 事件;你可以在 Service Worker 內部編寫程式碼以響應安裝。
我們來看一個示例,在 sw.js 檔案中(Service Worker)。你會看到安裝監聽器是針對 self 註冊的。這個 self 關鍵字是在 Service Worker 檔案內部引用 Service Worker 全域性範圍的一種方式。
在 install 處理程式內部,我們使用事件物件上可用的 ExtendableEvent.waitUntil() 方法,以表示瀏覽器不應在其中包含的 Promise 成功實現之前完成 Service Worker 的安裝。
這就是我們看到 Cache API 實際執行的地方。我們使用 CacheStorage.open() 方法開啟一個新的快取物件,用於儲存響應(類似於 IndexedDB 物件儲存)。此 Promise 以一個表示 video-store 快取的 Cache 物件實現。然後,我們使用 Cache.addAll() 方法獲取一系列資產並將其響應新增到快取中。
self.addEventListener("install", (e) => {
  e.waitUntil(
    caches
      .open("video-store")
      .then((cache) =>
        cache.addAll([
          "/learning-area/javascript/apis/client-side-storage/cache-sw/video-store-offline/",
          "/learning-area/javascript/apis/client-side-storage/cache-sw/video-store-offline/index.html",
          "/learning-area/javascript/apis/client-side-storage/cache-sw/video-store-offline/index.js",
          "/learning-area/javascript/apis/client-side-storage/cache-sw/video-store-offline/style.css",
        ]),
      ),
  );
});
目前就這些,安裝完成。
響應後續請求
Service Worker 已在我們的 HTML 頁面上註冊並安裝,並且相關資產已全部新增到我們的快取中,我們幾乎準備就緒。只剩下一件事要做:編寫一些程式碼來響應後續的網路請求。
這就是 sw.js 中第二部分程式碼所做的事情。我們向 Service Worker 全域性範圍添加了另一個監聽器,當 fetch 事件觸發時,它會執行處理程式函式。當瀏覽器請求 Service Worker 註冊目錄中的資產時,就會發生這種情況。
在處理程式內部,我們首先記錄請求資產的 URL。然後,我們使用 FetchEvent.respondWith() 方法為請求提供自定義響應。
在此塊內部,我們使用 CacheStorage.match() 檢查在任何快取中是否可以找到匹配的請求(即,匹配 URL)。如果找到匹配項,此 Promise 將以匹配的響應實現;如果未找到,則為 undefined。
如果找到匹配項,我們將其作為自定義響應返回。如果找不到,我們從網路中 獲取() 響應並返回它。
self.addEventListener("fetch", (e) => {
  console.log(e.request.url);
  e.respondWith(
    caches.match(e.request).then((response) => response || fetch(e.request)),
  );
});
這就是我們的 Service Worker 的全部內容。你可以用它們做更多的事情——有關更多詳細資訊,請參閱Service Worker 食譜。非常感謝 Paul Kinlan 的文章將 Service Worker 和離線功能新增到你的 Web 應用,它啟發了這個示例。
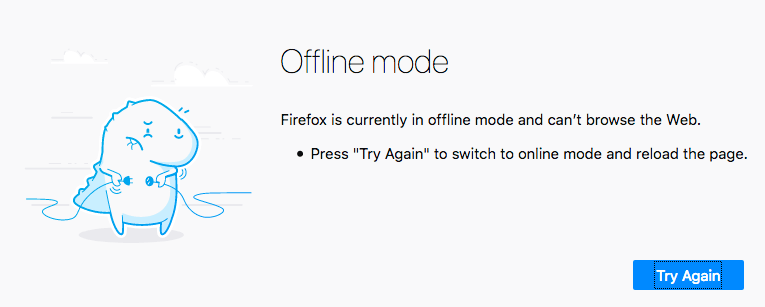
離線測試示例
要測試我們的Service Worker 示例,你需要載入它幾次以確保它已安裝。完成此操作後,你可以:
- 嘗試拔掉網線/關閉 Wi-Fi。
- 如果你使用的是 Firefox,請選擇 檔案 > 離線工作。
- 如果你使用的是 Chrome,請轉到開發者工具,然後選擇 應用程式 > Service Worker,然後勾選 離線 複選框。
如果你再次重新整理你的示例頁面,你應該仍然看到它載入得很好。所有內容都離線儲存——頁面資產在快取中,影片在 IndexedDB 資料庫中。
總結
目前就這些了。我們希望你覺得我們對客戶端儲存技術的概述很有用。