使用 Notifications API
透過 Notifications API,網頁或應用程式可以傳送在頁面外部、系統級別顯示的通知;這允許 Web 應用向用戶傳送資訊,即使應用程式處於空閒或後臺狀態。本文將介紹在您自己的應用中使用此 API 的基礎知識。
通常,系統通知是指作業系統標準的通知機制:例如,想象一下典型的桌面系統或移動裝置如何廣播通知。
當然,系統通知系統會因平臺和瀏覽器而異,但這沒關係,Notifications API 的設計足夠通用,可以與大多數系統通知系統相容。
示例
Web 通知最明顯的用例之一是基於 Web 的郵件或 IRC 應用程式,這些應用程式需要在收到新訊息時通知使用者,即使使用者正在使用其他應用程式處理其他事務。現在已經有很多此類示例,例如 Slack。
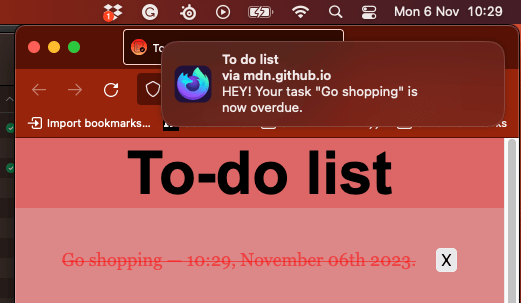
我們編寫了一個實際的示例——一個待辦事項列表應用程式——以更清晰地展示 Web 通知的使用方式。它使用 IndexedDB 在本地儲存資料,並透過系統通知通知使用者任務到期。您可以 下載待辦事項列表程式碼,或 檢視即時執行的應用程式。
請求許可權
在應用傳送通知之前,使用者必須授予應用程式相應的許可權。當 API 嘗試與 Web 頁面之外的某些內容互動時,這是一個常見要求——使用者至少需要明確授予該應用程式顯示通知的許可權一次,從而讓使用者控制允許哪些應用/網站顯示通知。
由於過去濫用推送通知的現象,Web 瀏覽器和開發者開始實施策略來幫助緩解這個問題。您應該僅在響應使用者操作(例如,點選按鈕)時請求顯示通知的同意。這不僅是最佳實踐——您不應該用未經使用者同意的通知騷擾使用者——而且未來瀏覽器將明確禁止未響應使用者操作而觸發的通知許可權請求。例如,Firefox 從 72 版本開始就已經這樣做,Safari 也是如此。
此外,在 Chrome 和 Firefox 中,除非網站是安全上下文(即 HTTPS),否則您根本無法請求通知,並且您不能再允許從跨域 <iframe> 請求通知許可權。
注意:本文中的示例使用 Notification() 建構函式來建立通知。這對於桌面來說是可以的,但在大多數移動瀏覽器上會丟擲 TypeError。如果您針對的是移動裝置,則應註冊一個服務工作執行緒並使用 ServiceWorkerRegistration.showNotification() 來代替。
檢查當前許可權狀態
您可以透過檢查只讀屬性 Notification.permission 的值來檢視是否已獲得許可權。它可能有以下三種可能的值之一:
獲取許可權
如果尚未獲得顯示通知的許可權,應用程式需要使用 Notification.requestPermission() 方法向用戶請求。最簡單的形式是,我們包含以下內容:
Notification.requestPermission().then((result) => {
  console.log(result);
});
這使用的是該方法的基於 Promise 的版本。如果您想支援舊版本,可能需要使用舊的回撥版本,它看起來像這樣:
Notification.requestPermission((result) => {
  console.log(result);
});
回撥版本可選地接受一個回撥函式,該函式在使用者響應顯示許可權請求後被呼叫。
注意:沒有可靠的方法來檢測 Notification.requestPermission 是否支援基於 Promise 的版本。如果您需要支援舊瀏覽器,只需使用基於回撥的版本——儘管它已棄用,但在新瀏覽器中仍然可用。有關更多資訊,請檢視 瀏覽器相容性表格。
示例
在我們的待辦事項列表演示中,我們包含了一個“啟用通知”按鈕,當按下該按鈕時,它會為應用程式請求通知許可權。
<button id="enable">Enable notifications</button>
點選此按鈕將呼叫 askNotificationPermission() 函式:
function askNotificationPermission() {
  // Check if the browser supports notifications
  if (!("Notification" in window)) {
    console.log("This browser does not support notifications.");
    return;
  }
  Notification.requestPermission().then((permission) => {
    // set the button to shown or hidden, depending on what the user answers
    notificationBtn.style.display = permission === "granted" ? "none" : "block";
  });
}
首先看第二個主要塊,您會看到我們首先檢查通知是否受支援。如果受支援,我們執行 Notification.requestPermission() 的基於 Promise 的版本;如果不支援,我們在控制檯記錄一條訊息。
在傳遞給 then 的 Promise 解析處理程式內部,我們根據使用者在許可權對話方塊中的選擇來顯示或隱藏按鈕。如果許可權已獲得,我們不想顯示它,但如果使用者選擇拒絕許可權,我們希望給他們以後改變主意的機會。
建立通知
建立通知很簡單;只需使用 Notification 建構函式即可。此建構函式需要一個要在通知中顯示的標題以及一些用於增強通知的選項,例如 icon 或文字 body。
例如,在待辦事項列表示例中,我們在需要時使用以下程式碼片段建立通知(位於 createNotification() 函式中):
const img = "/to-do-notifications/img/icon-128.png";
const text = `HEY! Your task "${title}" is now overdue.`;
const notification = new Notification("To do list", { body: text, icon: img });
關閉通知
使用 close() 來移除對使用者不再相關的通知(例如,在訊息應用程式中,使用者已在網頁上閱讀了通知;或者在音樂應用程式中,下一首歌曲已在播放,以通知歌曲更改)。大多數現代瀏覽器會在幾秒鐘後自動關閉通知(大約四秒),但這通常不是您應該關心的事情,因為它取決於使用者和使用者代理。關閉也可能發生在作業系統級別,並且使用者應該對此保持控制。舊版本的 Chrome 沒有自動刪除通知,因此您可以只為那些舊版本使用 setTimeout(),以避免刪除其他瀏覽器上的通知托盤中的通知。
const n = new Notification("My Great Song");
document.addEventListener("visibilitychange", () => {
  if (document.visibilityState === "visible") {
    // The tab has become visible so clear the now-stale Notification.
    n.close();
  }
});
注意:此 API 不應僅用於在固定延遲後(在現代瀏覽器中)關閉螢幕上的通知,因為此方法還將從任何通知托盤中刪除通知,阻止使用者在初始顯示後與其互動。
注意:當您收到“close”事件時,無法保證是使用者關閉了通知。這符合規範,其中規定:“當通知被關閉時,無論是由底層通知平臺還是由使用者關閉,都必須執行其關閉步驟。”
通知事件
在 Notification 例項上會觸發四個事件:
可以使用 onclick、onclose、onerror 和 onshow 處理程式來跟蹤這些事件。由於 Notification 也繼承自 EventTarget,因此可以在其上使用 addEventListener() 方法。
替換現有通知
使用者在短時間內收到大量通知通常是不受歡迎的——例如,如果一個訊息應用程式為每條傳入訊息通知使用者,而它們傳送了很多怎麼辦?為了避免向用戶傳送過多通知,可以修改待處理的通知佇列,用新通知替換一個或多個待處理的通知。
為此,可以為任何新通知新增一個標籤。如果通知已具有相同的標籤且尚未顯示,則新通知將替換該前一個通知。如果具有相同標籤的通知已顯示,則前一個通知將被關閉,然後顯示新通知。
標籤示例
假設以下基本 HTML:
<button id="notify">Notify me!</button>
<section id="demo-logs"></section>
透過這種方式可以處理多個通知:
const demoLogs = document.querySelector("#demo-logs");

const button = document.querySelector("#notify");

button.addEventListener("click", () => {
  if (Notification?.permission === "granted") {
    demoLogs.innerText += `The site has permission to show notifications. Showing notifications.\n`;
    // If the user agreed to get notified
    // Let's try to send ten notifications
    let i = 0;
    // Using an interval cause some browsers (including Firefox) are blocking notifications if there are too much in a certain time.
    const interval = setInterval(() => {
      // Thanks to the tag, we should only see the "Hi no 9 from MDN." notification
      const n = new Notification(`Hi no ${i} from MDN.`, {
        tag: "soManyNotification",
      });
      if (i === 9) {
        clearInterval(interval);
      }
      i++;
    }, 200);
  } else if (Notification?.permission !== "denied") {
    demoLogs.innerText += "Requesting notification permission.\n";
    // If the user hasn't told if they want to be notified or not
    // Note: because of Chrome, we are not sure the permission property
    // is set, therefore it's unsafe to check for the "default" value.
    Notification.requestPermission().then((status) => {
      // If the user said okay
      if (status === "granted") {
        demoLogs.innerText +=
          "User granted the permission. Sending notifications.\n";
        let i = 0;
        // Using an interval cause some browsers (including Firefox) are blocking notifications if there are too much in a certain time.
        const interval = setInterval(() => {
          // Thanks to the tag, we should only see the "Message no 9 from MDN." notification
          const n = new Notification(`Message no ${i} from MDN.`, {
            tag: "soManyNotification",
          });
          if (i === 9) {
            clearInterval(interval);
          }
          i++;
        }, 200);
      } else {
        // Otherwise, we can fallback to a regular modal alert
        demoLogs.innerText += `User denied the permission request.\n`;
      }
    });
  } else {
    // If the user refuses to get notified, we can fallback to a regular modal alert
    demoLogs.innerText += `The site does not have permission to show notifications.\n`;
  }
});
結果
要測試上述示例,請更改 https://live.mdnplay.dev 網站的 傳送通知設定。