構建和更新 DOM 樹
本文概述了一些強大的、基礎的 DOM Level 1 方法以及如何從 JavaScript 中使用它們。您將學習如何動態建立、訪問、控制和刪除 HTML 元素。此處介紹的 DOM 方法並非僅限於 HTML;它們也適用於 XML。此處提供的演示在任何現代瀏覽器中都能正常工作。
注意:此處介紹的 DOM 方法是 Document Object Model (Core) Level 1 規範的一部分。DOM Level 1 包括用於通用文件訪問和操作的方法 (DOM 1 Core) 以及特定於 HTML 文件的方法 (DOM 1 HTML)。
動態建立 HTML 表格
示例
在此示例中,當點選按鈕時,我們向頁面新增一個新表格。
HTML
<input type="button" value="Generate a table" />
JavaScript
function generateTable() {
  // creates a <table> element and a <tbody> element
  const tbl = document.createElement("table");
  const tblBody = document.createElement("tbody");

  // creating all cells
  for (let i = 0; i < 2; i++) {
    // creates a table row
    const row = document.createElement("tr");

    for (let j = 0; j < 2; j++) {
      // Create a <td> element and a text node, make the text
      // node the contents of the <td>, and put the <td> at
      // the end of the table row
      const cell = document.createElement("td");
      const cellText = document.createTextNode(`cell in row ${i}, column ${j}`);
      cell.appendChild(cellText);
      row.appendChild(cell);
    }

    // add the row to the end of the table body
    tblBody.appendChild(row);
  }

  // put the <tbody> in the <table>
  tbl.appendChild(tblBody);
  // appends <table> into <body>
  document.body.appendChild(tbl);
  // sets the border attribute of tbl to '2'
  tbl.setAttribute("border", "2");
}

document
  .querySelector("input[type='button']")
  .addEventListener("click", generateTable);
結果
解釋
注意我們建立元素和文字節點時的順序
- 首先,我們建立了
<table>元素。 - 接下來,我們建立了
<tbody>元素,它是<table>元素的子元素。 - 接下來,我們使用迴圈建立
<tr>元素,它們是<tbody>元素的子元素。 - 對於每個
<tr>元素,我們使用迴圈建立<td>元素,它們是<tr>元素的子元素。 - 對於每個
<td>元素,我們建立了包含表格單元格文字的文字節點。
一旦我們建立了 <table>、<tbody>、<tr> 和 <td> 元素,然後建立了文字節點,我們就以相反的順序將每個物件附加到其父節點。
-
首先,我們使用以下方法將每個文字節點附加到其父
<td>元素:jscell.appendChild(cellText); -
接下來,我們使用以下方法將每個
<td>元素附加到其父<tr>元素:jsrow.appendChild(cell); -
接下來,我們使用以下方法將每個
<tr>元素附加到父<tbody>元素:jstblBody.appendChild(row); -
接下來,我們使用以下方法將
<tbody>元素附加到其父<table>元素:jstbl.appendChild(tblBody); -
接下來,我們使用以下方法將
<table>元素附加到其父<body>元素:jsdocument.body.appendChild(tbl);
記住這個技巧。在 W3C DOM 程式設計中,您會經常使用它。首先,您從上到下建立元素;然後,您從下到上將子節點附加到父節點。
這是 JavaScript 程式碼生成的 HTML 標記
<table border="2">
  <tbody>
    <tr>
      <td>cell is row 0 column 0</td>
      <td>cell is row 0 column 1</td>
    </tr>
    <tr>
      <td>cell is row 1 column 0</td>
      <td>cell is row 1 column 1</td>
    </tr>
  </tbody>
</table>
這是程式碼生成的 <table> 元素及其子元素的 DOM 物件樹
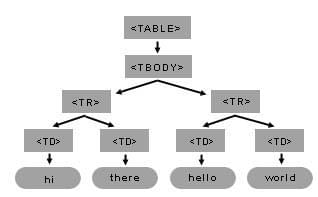
您可以使用一些 DOM 方法來構建此表格及其內部子元素。請記住您要建立的結構的樹模型;這將使編寫必要的程式碼更容易。在圖 1 的 <table> 樹中,<table> 元素有一個子元素:<tbody> 元素。<tbody> 有兩個子元素。每個 <tbody> 的子元素 (<tr>) 有兩個子元素 (<td>)。最後,每個 <td> 有一個子元素:一個文字節點。
設定段落的背景顏色
示例
在此示例中,當點選按鈕時,我們更改段落的背景顏色。
HTML
<body>
  <input type="button" value="Set paragraph background color" />
  <p>hi</p>
  <p>hello</p>
</body>
JavaScript
function setBackground() {
  // now, get all the p elements in the document
  const paragraphs = document.getElementsByTagName("p");

  // get the second paragraph from the list
  const secondParagraph = paragraphs[1];

  // set the inline style
  secondParagraph.style.background = "red";
}

document.querySelector("input").addEventListener("click", setBackground);
結果
解釋
getElementsByTagName(tagNameValue) 是任何 DOM Element 或根 Document 元素都可用的方法。呼叫時,它會返回一個包含所有匹配該標籤名的元素後代的陣列。列表的第一個元素位於陣列的位置 [0]。
我們執行了以下步驟
使用 document.createTextNode("..") 建立 TextNodes
使用 document 物件呼叫 createTextNode 方法並建立您的文字節點。您只需要傳遞文字內容。返回值是一個代表文字節點的物件。
myTextNode = document.createTextNode("world");
這意味著您建立了一個型別為 TEXT_NODE (一段文字) 的節點,其文字資料為 "world",而 myTextNode 是指向此節點物件的引用。要將此文字插入到您的 HTML 頁面中,您需要將此文字節點作為另一個節點元素的子節點。
使用 appendChild(..) 插入元素
因此,透過呼叫 secondParagraph.appendChild(node_element),您將該元素作為第二個 <p> 元素的新的子元素。
secondParagraph.appendChild(myTextNode);
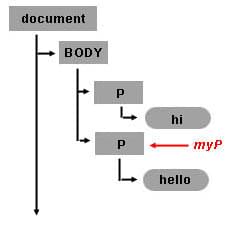
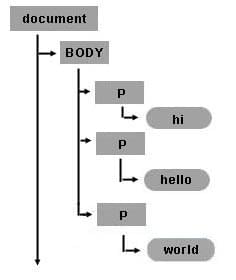
測試完此示例後,請注意單詞 hello 和 world 在一起:helloworld。因此,在視覺上,當您看到 HTML 頁面時,似乎兩個文字節點 hello 和 world 是一個節點,但請記住,在文件模型中,有兩個節點。第二個節點是型別為 TEXT_NODE 的新節點,它是第二個 <p> 標籤的第二個子節點。下圖顯示了最近建立的 Text Node 物件在文件樹中的位置。
注意: createTextNode() 和 appendChild() 是在單詞 hello 和 world 之間包含空格的簡單方法。另一個重要注意事項是,appendChild 方法會在最後一個子節點之後附加子節點,就像 world 這個詞被新增到 hello 之後一樣。所以,如果您想在 hello 和 world 之間附加一個文字節點,您需要使用 insertBefore 而不是 appendChild。
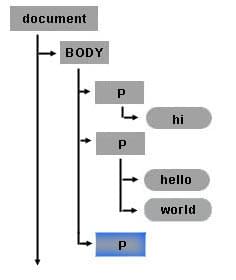
使用 document 物件和 createElement(..) 方法建立新元素
您可以使用 createElement 建立新的 HTML 元素或任何您想要的元素。例如,如果您想建立一個新的 <p> 元素作為 <body> 元素的子元素,您可以使用上一個示例中的 myBody 並附加一個新元素節點。要建立一個節點,請呼叫 document.createElement("tagname")。例如:
myNewPTagNode = document.createElement("p");
myBody.appendChild(myNewPTagNode);
使用 removeChild(..) 方法刪除節點
節點可以被刪除。以下程式碼會從第二個 <p> 元素 secondParagraph 中刪除文字節點 myTextNode(包含單詞 "world")。
secondParagraph.removeChild(myTextNode);
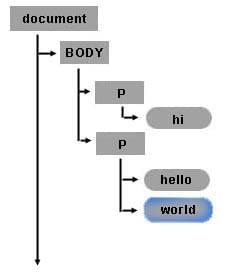
文字節點 myTextNode(包含單詞 "world")仍然存在。以下程式碼將 myTextNode 附加到最近建立的 <p> 元素 myNewPTagNode。
myNewPTagNode.appendChild(myTextNode);
修改後的物件樹的最終狀態如下所示
動態建立表格
下圖顯示了示例中建立的表格的表格物件樹結構。
回顧 HTML 表格結構
建立元素節點並將它們插入到文件樹中
建立表格的基本步驟是:
- 獲取 body 物件(document 物件的第一個項)。
- 建立所有元素。
- 最後,根據表格結構(如上圖所示)附加每個子節點。
注意:在指令碼的最後,有一行新程式碼。表格的 border 屬性是使用另一個 DOM 方法 setAttribute() 設定的。setAttribute() 有兩個引數:屬性名和屬性值。您可以使用 setAttribute 方法設定任何元素的任何屬性。
// get the reference for the body
const myBody = document.getElementsByTagName("body")[0];

// creates <table> and <tbody> elements
const myTable = document.createElement("table");
const myTableBody = document.createElement("tbody");

// creating all cells
for (let j = 0; j < 3; j++) {
  // creates a <tr> element
  const myCurrentRow = document.createElement("tr");

  for (let i = 0; i < 4; i++) {
    // creates a <td> element
    const myCurrentCell = document.createElement("td");
    // creates a Text Node
    const currentText = document.createTextNode(
      `cell is row ${j}, column ${i}`,
    );
    // appends the Text Node we created into the cell <td>
    myCurrentCell.appendChild(currentText);
    // appends the cell <td> into the row <tr>
    myCurrentRow.appendChild(myCurrentCell);
  }
  // appends the row <tr> into <tbody>
  myTableBody.appendChild(myCurrentRow);
}

// appends <tbody> into <table>
myTable.appendChild(myTableBody);
// appends <table> into <body>
myBody.appendChild(myTable);
// sets the border attribute of myTable to 2;
myTable.setAttribute("border", "2");
使用 DOM 和 CSS 操作表格
從表格中獲取文字節點
此示例引入了兩個新的 DOM 屬性。首先,它使用 childNodes 屬性獲取 myCell 的子節點列表。childNodes 列表包括所有子節點,無論它們的名稱或型別是什麼。與 getElementsByTagName() 類似,它返回一個節點列表。
區別在於 (a) getElementsByTagName() 只返回指定標籤名的元素;以及 (b) childNodes 包括任何級別的所有後代,而不僅僅是直接子節點。
一旦您獲得了返回的列表,就可以使用 [x] 方法來檢索所需的子項。此示例將表格第二行第二個單元格的文字節點儲存在 myCellText 中。
然後,為了在此示例中顯示結果,它會建立一個新的文字節點,其內容是 myCellText 的資料,並將其作為 <body> 元素的子節點附加。
注意:如果您的物件是文字節點,您可以使用 data 屬性並檢索節點的文字內容。
const myBody = document.getElementsByTagName("body")[0];
const myTable = myBody.getElementsByTagName("table")[0];
const myTableBody = myTable.getElementsByTagName("tbody")[0];
const myRow = myTableBody.getElementsByTagName("tr")[1];
const myCell = myRow.getElementsByTagName("td")[1];

// first item element of the childNodes list of myCell
const myCellText = myCell.childNodes[0];

// content of currentText is the data content of myCellText
const currentText = document.createTextNode(myCellText.data);
myBody.appendChild(currentText);
獲取屬性值
在 sample1 的末尾,有一個對 myTable 物件呼叫 setAttribute 的地方。此呼叫用於設定表格的 border 屬性。要檢索屬性的值,請使用 getAttribute 方法。
myTable.getAttribute("border");
透過更改樣式屬性隱藏列
一旦您將物件放入 JavaScript 變數中,您就可以直接設定 style 屬性。以下程式碼是一個修改版本,其中隱藏了第二列的每個單元格,並將第一列的每個單元格的背景更改為紅色。請注意,style 屬性是直接設定的。
const myBody = document.getElementsByTagName("body")[0];
const myTable = document.createElement("table");
const myTableBody = document.createElement("tbody");

for (let row = 0; row < 2; row++) {
  const myCurrentRow = document.createElement("tr");
  for (let col = 0; col < 2; col++) {
    const myCurrentCell = document.createElement("td");
    const currentText = document.createTextNode(`cell is: ${row}${col}`);
    myCurrentCell.appendChild(currentText);
    myCurrentRow.appendChild(myCurrentCell);
    // set the cell background color
    // if the column is 0. If the column is 1 hide the cell
    if (col === 0) {
      myCurrentCell.style.background = "red";
    } else {
      myCurrentCell.style.display = "none";
    }
  }
  myTableBody.appendChild(myCurrentRow);
}
myTable.appendChild(myTableBody);
myBody.appendChild(myTable);