
使用 TestGrid 實現傳統測試自動化的現代化
團隊使用各種工具和指令碼自動化軟體測試已成為一項標準實踐。然而,傳統的測試自動化方法並未像應用程式開發實踐那樣同步發展。這種差距凸顯了現代化測試自動化方法的必要性,以跟上更快的軟體開發週期。
TestGrid 的統一測試平臺旨在透過提供易於訪問的端到端測試自動化以及對 Selenium 和 Appium 等流行工具的無縫支援來簡化測試流程。
在本文中,我們將涵蓋 Web 和移動應用程式的自動化測試的傳統方法和更新方法。我們將從檢視常用的測試自動化方法開始,瞭解它們的不足之處,並討論提高效率的方法。然後,我們將深入探討更現代的方法。
使用傳統的測試自動化方法
測試自動化側重於編寫使用者旅程和應用程式功能的指令碼,以驗證應用程式是否按預期工作。測試自動化的傳統方法主要依賴於編寫測試指令碼。
這種方法的一個主要缺點是,隨著應用程式功能的增長,這些指令碼會變得難以維護,從而導致高昂的維護成本。指令碼也可能變得不穩定,導致間歇性失敗。
讓我們看看兩種廣泛採用的測試自動化方法:使用 Selenium 和 Appium。
使用 Selenium 自動化 Web 應用程式測試
Selenium 是開發人員和測試人員用來為 Web 應用程式編寫自動化 UI 測試的流行測試自動化工具。這些測試可以在不同的 Web 瀏覽器中執行,並且可以使用 Selenium 支援的眾多語言之一來編寫。
讓我們看一個使用 Selenium 編寫自動化測試的例子。我們將使用一個 演示測試網站 來執行以下步驟:
- 啟動您選擇的瀏覽器。
- 導航到 demoqa.com 的登入頁面。
- 輸入使用者名稱和密碼。
- 點選登入按鈕。
- 驗證使用者已登入,並且使用者名稱顯示在螢幕上。
注意:您可以使用新使用者按鈕建立使用者,以便為測試自動化場景提供有效的憑據。
確保您具備開始使用 Selenium 所需的先決條件。您可以按照 使用 Java 設定 Selenium 的分步指南 在您的系統上進行操作。
這是我們將用於自動化上述步驟執行的 Selenium 程式碼。
public class Login {
  @Test
  public void loginTest() throws InterruptedException {

    WebDriver driver = new ChromeDriver(); // Instantiating the webdriver instance
    driver.get("https://demoqa.com/login"); // Launching the website
    driver.manage().window().maximize(); // Maximizing browser window

    String user = "your user name";
    String pass = "your password";

    // Locating web elements for username, password, and the Login button
    driver.findElement(By.id("userName")).sendKeys(user);
    driver.findElement(By.id("password")).sendKeys(pass);
    driver.findElement(By.id("login")).click();

    // Using sleep to load web elements on page
    Thread.sleep(5000);

    // Capturing the displayed username after login
    String uName = driver.findElement(By.id("userName-value")).getText();

    // Asserting that the logged-in username matches the expected username
    Assert.assertEquals(uName, user);

    // Locating the web element for the Logout button and closing the webdriver instance
    driver.findElement(By.id("submit")).click();
    driver.quit();
  }
}
如註釋中所述,在此程式碼中,我們正在啟動我們的網站,定位 Web 元素,然後在它們上執行所需的操作。執行此程式碼後,您應該會看到成功的執行日誌。
上述自動化測試驗證了一個關鍵的使用者登入功能。然而,構建和維護此類測試可能非常耗時。應用程式的任何微小更改都可能需要更新整個測試套件中的程式碼,從而增加開銷。此外,在傳統的測試自動化方法下,測試環境的組合可能受到限制。
將 Selenium 與 TestGrid 結合使用以自動化 Web 應用程式測試
讓我們使用 TestGrid 的真實裝置雲 在我們選擇的雲瀏覽器和平臺上執行上一節中顯示的 Selenium 程式碼。TestGrid 允許重用您現有的 Selenium 測試指令碼並擴充套件您的自動化測試執行。
登入 TestGrid 並按照 在 Web 瀏覽器上執行本地 Selenium 程式碼的分步指南。
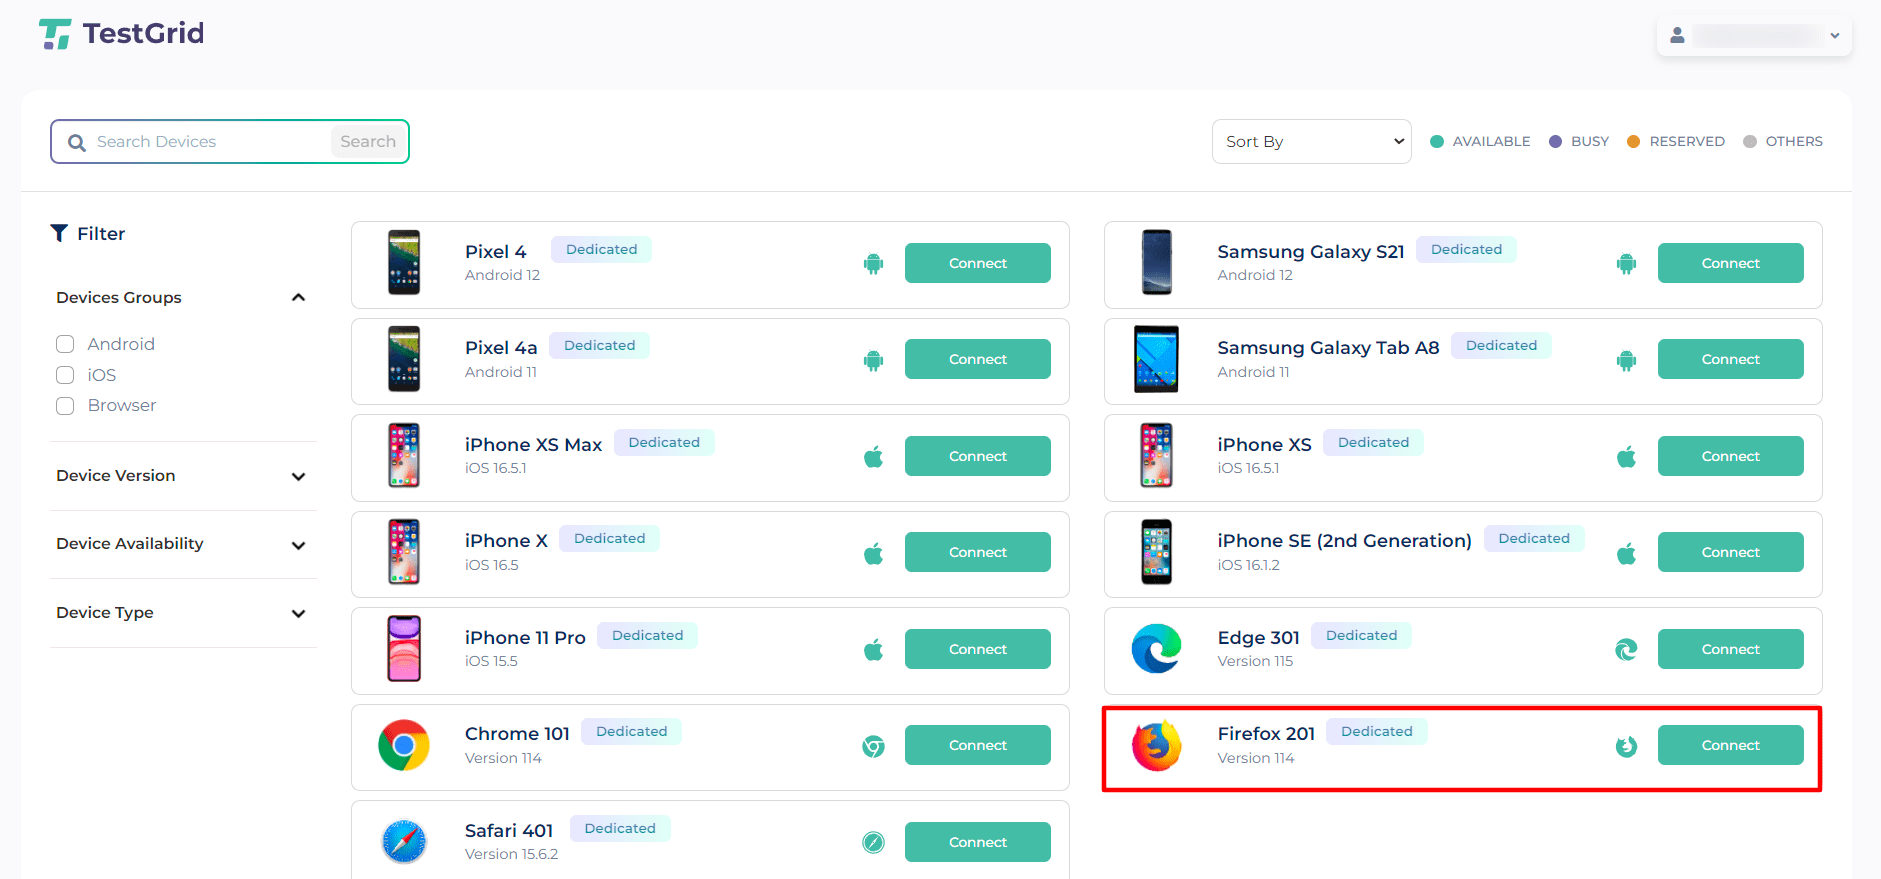
下圖顯示了 TestGrid 的真實裝置雲儀表板。在我們的示例中,我們選擇了 Linux 平臺上的 Firefox 瀏覽器。
按照上面連結指南中的步驟並設定所需的配置後,我們得到以下程式碼:
public class TestGridDemoQaLogin {

  @Test
  public void loginTest() throws InterruptedException, MalformedURLException {

    // Setting the desired capabilities to use the TestGrid platform
    DesiredCapabilities dc = new DesiredCapabilities();
    dc.setCapability("browserName", "firefox");
    dc.setCapability("platformName", "linux");
    dc.setCapability("tg:userToken", "Your Token");
    dc.setCapability("tg:udid", "201");

    // Instantiating the remote webdriver instance and passing desired capabilities to it
    WebDriver driver = new RemoteWebDriver(new URL("Your Browser Run URL(Public)"),dc);

    // Remaining steps are the same as in the previous Selenium code
    driver.get("https://demoqa.com/login");
    driver.manage().window().maximize();

    String user = "your user name";
    String pass = "your password";

    driver.findElement(By.id("userName")).sendKeys(user);
    driver.findElement(By.id("password")).sendKeys(pass);
    driver.findElement(By.id("login")).click();

    Thread.sleep(5000);

    String uName = driver.findElement(By.id("userName-value")).getText();

    Assert.assertEquals(uName, user);

    driver.findElement(By.id("submit")).click();
    driver.quit();
  }
}
當您在本地系統上執行此程式碼時,您會注意到它在 TestGrid 的真實裝置雲上執行。您可以從入口網站檢視遠端執行。您還可以透過簡單地選擇執行測試的裝置,在自動化會話選項卡上檢視執行狀態、錄製和執行摘要。
使用 Appium 自動化移動應用程式測試
Appium 是一個流行的開源自動化框架,用於測試原生、混合和移動 Web 應用程式。編寫 Appium 指令碼需要了解移動作業系統以及 Java、C++ 和 Python 等程式語言。對於移動應用程式的自動化測試,由於技術棧的快速發展以及裝置和作業系統的更新,維護測試指令碼可能具有挑戰性。
對於這裡的演示,我們使用的是基本的計算器應用程式。我們將使用 Appium 自動化以下用例測試:
- 啟動計算器應用程式。
- 執行兩個數字的乘法。
- 記錄數學運算的結果。
- 斷言結果。
我們在這裡將 Appium 與 Java 結合使用。測試在虛擬裝置(模擬器)上執行。您可以使用真實裝置或虛擬裝置進行測試執行。遵循此 Appium 教程 進行設定和其他先決條件。
這是我們使用的 Appium 程式碼,它將在本地系統上執行以執行上述步驟。
package appium;

import java.net.MalformedURLException;
import java.net.URL;
import org.openqa.selenium.remote.DesiredCapabilities;
import org.testng.Assert;
import org.testng.annotations.Test;
import io.appium.java_client.AppiumBy;
import io.appium.java_client.android.AndroidDriver;

public class Calculator {

  @Test
  public void calculator() throws MalformedURLException {

    DesiredCapabilities dc = new DesiredCapabilities();

    // Setting the desired capabilities for the android device
    dc.setCapability("platformName", "android");
    dc.setCapability("platformVersion","14");
    dc.setCapability("deviceName", "Pixel6_TestGrid");
    dc.setCapability("automationName", "UiAutomator2");

    // Setting capability for the application we want to test
    dc.setCapability("app", "/Users/macair/Downloads/calculator.apk");

    // Instantiating Android Driver and using Appium server host and port
    AndroidDriver driver = new AndroidDriver(new URL("http://127.0.0.1:4723/wd/hub"), dc);

    // Locating numbers, mathematical operators, and the equals button in the Calculator app
    driver.findElement(AppiumBy.id("com.google.android.calculator:id/digit_4")).click();
    driver.findElement(AppiumBy.id("com.google.android.calculator:id/op_mul")).click();
    driver.findElement(AppiumBy.id("com.google.android.calculator:id/digit_9")).click();
    driver.findElement(AppiumBy.id("com.google.android.calculator:id/eq")).click();

    // Storing the result in a string variable
    String result = driver.findElement(
      AppiumBy.id("com.google.android.calculator:id/result_final")
    ).getText();
    System.out.println("The result is - "+result);

    Assert.assertEquals(result, "36");
    driver.quit();
  }
}
我們的測試程式碼執行良好。但是,它需要具備相關技能和知識的專業人員才能實施。此外,執行這些測試的裝置可用性有限,這可能會使實現最佳測試覆蓋率變得困難。
將 Appium 與 TestGrid 結合使用以自動化移動應用程式測試
讓我們看看如何在真實裝置雲上執行 Appium 測試指令碼。使用我們本地 Appium 移動測試的方法與我們上面看到的 Web 應用程式的方法非常相似。您可以遵循此 在裝置雲上執行本地 Appium 程式碼的分步指南。
讓我們看看更新後的程式碼,其中包含與我們選擇的 TestGrid 裝置相匹配的 DesiredCapabilities。例如,我們指定了 udid、systemPort 和 userToken。
package appium;

import java.net.MalformedURLException;
import java.net.URL;
import org.openqa.selenium.remote.DesiredCapabilities;
import org.testng.Assert;
import org.testng.annotations.Test;
import io.appium.java_client.AppiumBy;
import io.appium.java_client.android.AndroidDriver;

public class CalculatorTestGrid {

  @Test
  public void calculator() throws MalformedURLException {

    DesiredCapabilities dc = new DesiredCapabilities();

    // Setting the desired capabilities for the android device
    dc.setCapability("platformName", "android");
    dc.setCapability("platformVersion","12");
    dc.setCapability("deviceName", "Samsung Galaxy S21");
    dc.setCapability("automationName", "UiAutomator2");
    dc.setCapability("udid", "R5CRC28KGKB");
    dc.setCapability("tg:systemPort", "4005");
    dc.setCapability("tg:userToken", "Your user token");

    // Since the application is installed on the device, we directly use
    // the package name and main activity
    dc.setCapability("appPackage", "com.google.android.calculator");
    dc.setCapability("appActivity", "com.android.calculator2.Calculator");

    AndroidDriver driver = new AndroidDriver(new URL("Your TestGrid Appium URL"), dc);

    // Remaining steps are the same as in the previous Appium code
    driver.findElement(AppiumBy.id("com.google.android.calculator:id/digit_4")).click();
    driver.findElement(AppiumBy.id("com.google.android.calculator:id/op_mul")).click();
    driver.findElement(AppiumBy.id("com.google.android.calculator:id/digit_9")).click();
    driver.findElement(AppiumBy.id("com.google.android.calculator:id/eq")).click();

    String result = driver.findElement(
      AppiumBy.id("com.google.android.calculator:id/result_final")
    ).getText();
    System.out.println("The result is - "+result);

    Assert.assertEquals(result, "36");
    driver.quit();
  }
}
執行此更新程式碼後,您應該會在 IDE 中看到成功的執行日誌。您還可以透過導航到左側面板中的自動化會話選項卡並選擇執行程式碼的裝置來檢視執行結果(或正在進行的執行摘要)。
您將能夠看到執行的每個步驟的狀態以及它們的螢幕截圖。此外,您還可以檢視這些測試的日誌和視覺測試結果(如果已啟用)。
利用 TestGrid 的現代化自動化測試解決方案
TestGrid 的無程式碼測試自動化平臺允許程式設計知識很少或沒有程式設計知識的使用者開始自動化測試。透過使用無程式碼自動化,您可以直觀地記錄使用者旅程。錄製會自動生成測試指令碼,因此無需進行編碼。此功能還有助於大幅減少指令碼維護開銷。
使用 TestGrid 的測試指令碼生成器自動化 Web 應用程式測試
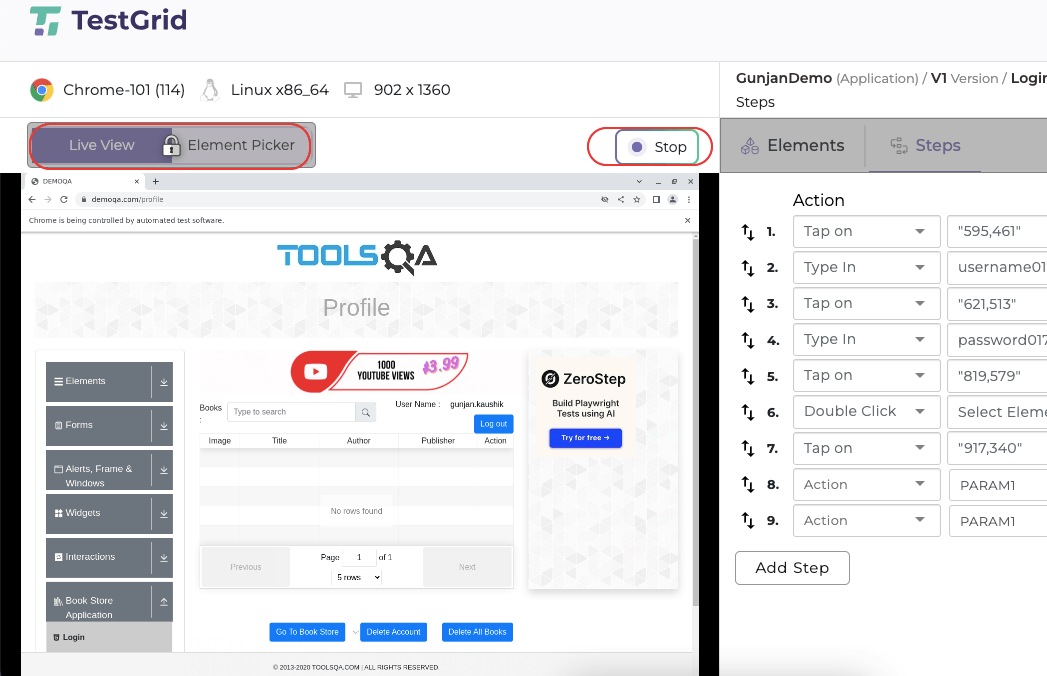
讓我們看看如何使用 TestGrid 的 無指令碼 Web 測試用例編寫器,在沒有任何程式碼的情況下自動化 demoqa 網站的相同“登入”用例。按照新增測試用例時測試用例生成器提示的步驟進行操作。輸入 URL,選擇瀏覽器和網頁,然後根據需要為頁面上的不同元素新增操作。
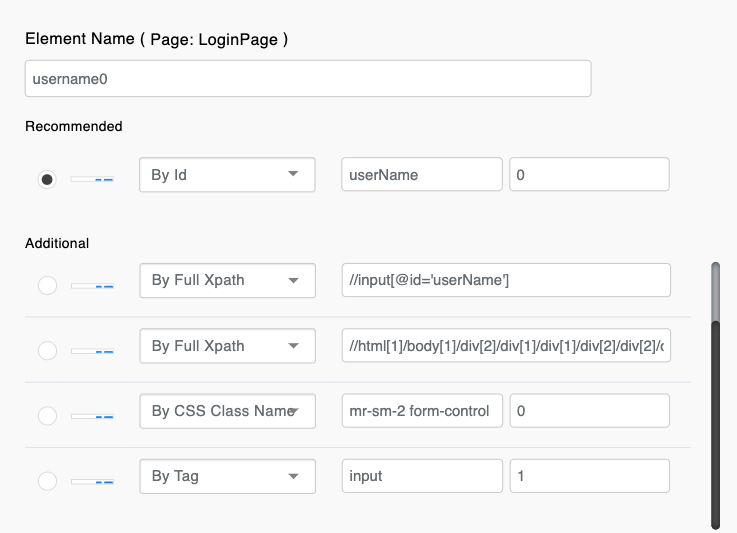
正如您將在下面的螢幕截圖中看到的,當您單擊要互動的 Web 元素區域時,將自動檢測到該元素的定位器。您還將看到指定了不同的定位器,您可以選擇所需的定位器。您還可以選擇手動編寫定位器,以防系統無法檢測到 Web 元素的定位器。
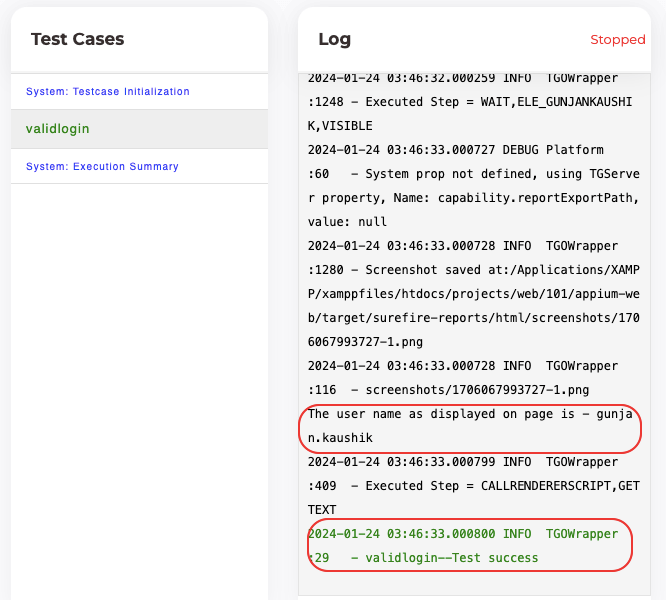
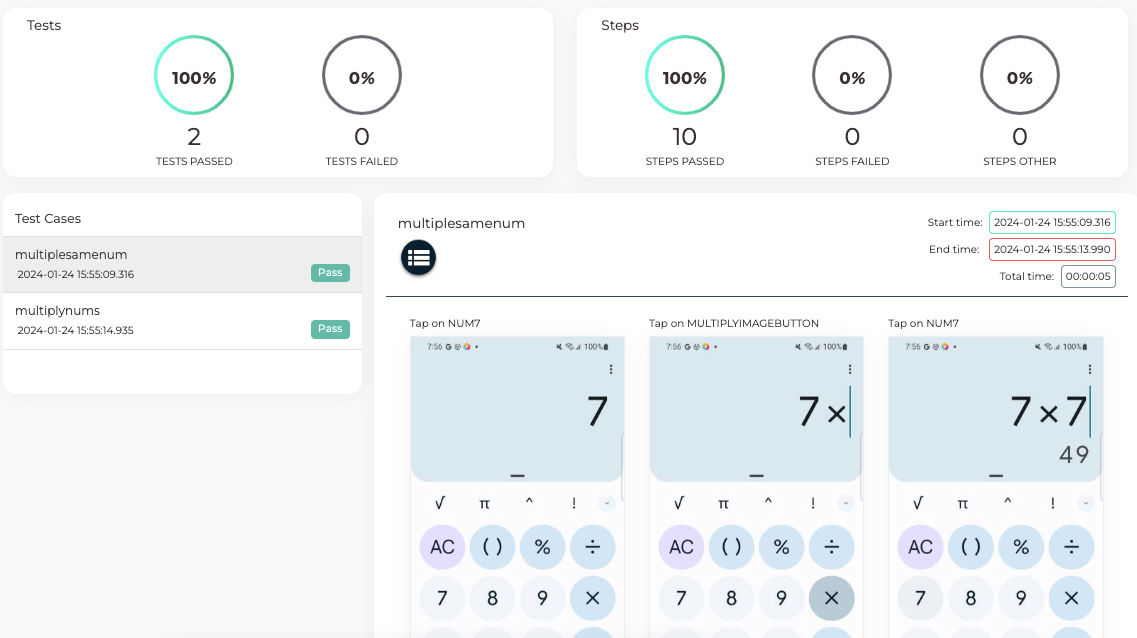
在擁有所需的測試資料後,您可以新增登入操作以及必要的詳細資訊,以生成測試用例的測試函式。然後,您可以執行您的測試用例。隨著執行的進行,您可以開始觀察正在生成的日誌和測試狀態。
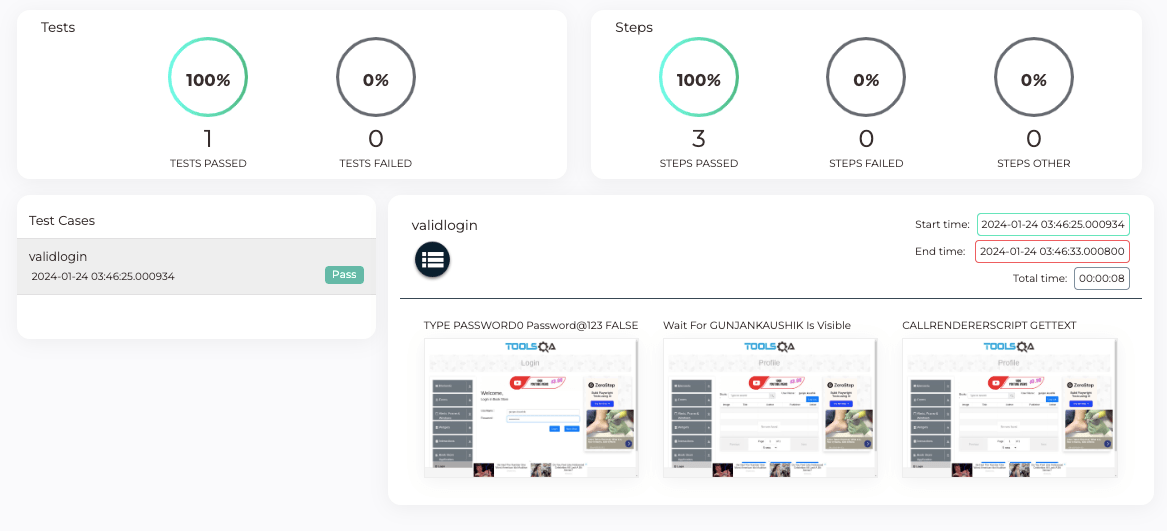
單擊左側面板中的構建摘要,可檢視諸如透過和失敗的步驟數、執行步驟的螢幕截圖(如果已啟用)、開始和結束時間以及測試狀態等詳細資訊。
執行完成後,您可以訪問左側面板中事務分析下的各種分析報告。
TestGrid 的無程式碼測試生成器提供的另一項功能是“錄製和播放”。它允許您將應用程式或瀏覽器操作轉換為健壯的自動化測試。在您建立專案和模組後,您可以單擊使用無指令碼新增測試用例來使用此功能。您會注意到右側面板中有一個開始錄製按鈕,單擊它將開始錄製您的操作。完成後,您可以單擊停止。請注意,即時檢視和元素選擇器在執行期間會被鎖定。
停止錄製後,您可以編輯操作列中的引數,甚至可以使用元素選擇器對通過錄制新增的步驟進行更多更改。
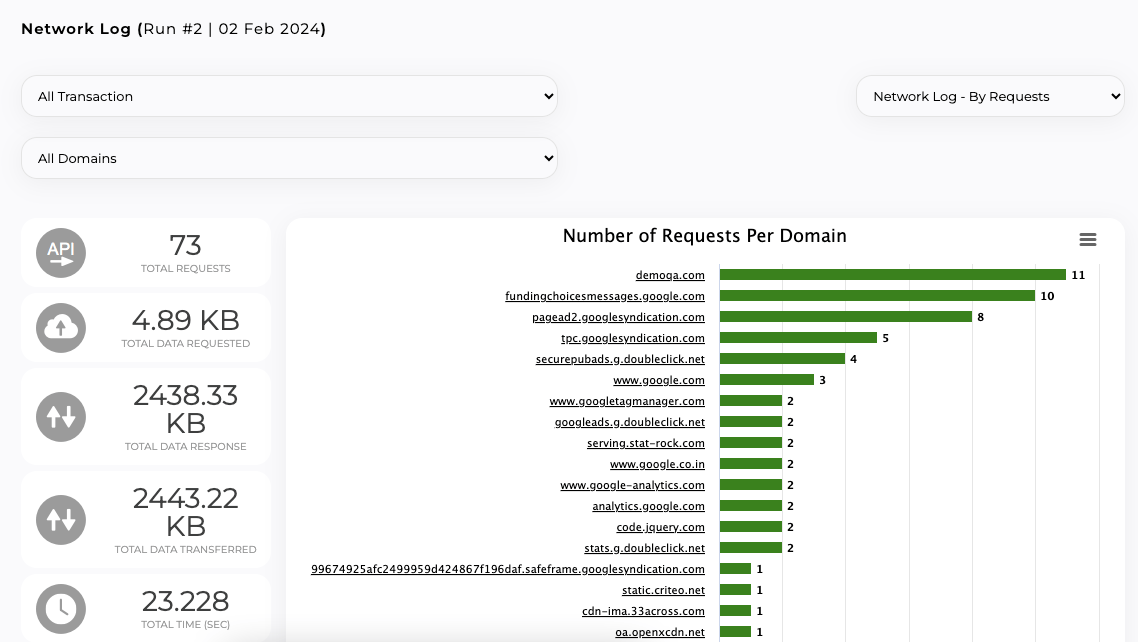
然後,您可以導航回測試用例並像之前一樣執行測試。您將能夠看到執行情況以及不同分析報告中的結果。使用網路日誌,您可以檢視傳送到域的請求以及每個請求所花費的時間。
本節演示瞭如何輕鬆編寫無指令碼自動化測試用例,並在需要時新增自定義指令碼。TestGrid 的測試指令碼生成器可以幫助您提高現代 Web 應用程式自動化測試的速度和可靠性。
使用 TestGrid 的測試指令碼生成器自動化移動應用程式測試
與 Web 應用程式測試一樣,您可以使用 TestGrid 的 無指令碼移動應用測試用例編寫 來測試移動應用程式。使用此功能,您可以快速開始自動化移動應用程式,而無需手動設定執行自動化測試所需的伺服器、客戶端、裝置和其他配置。
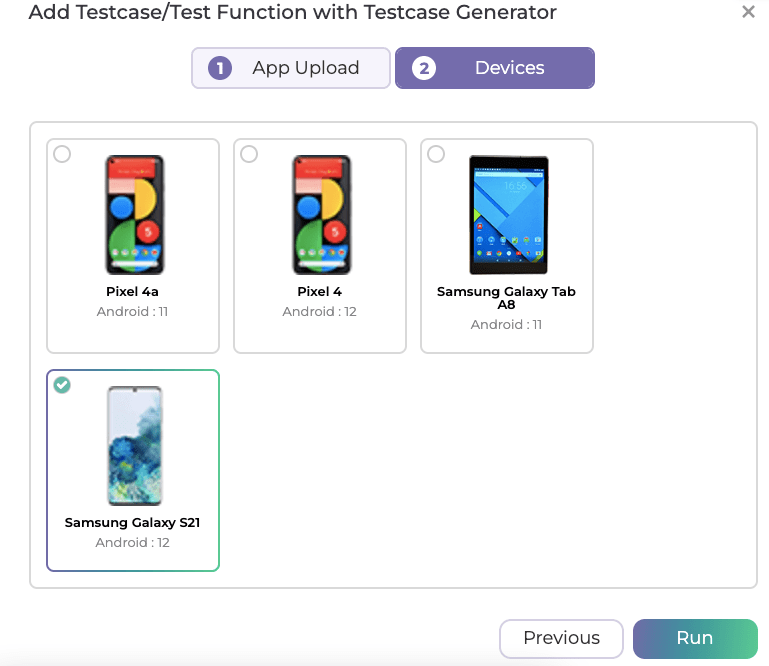
單擊使用測試用例生成器新增測試函式按鈕後,您會看到一個彈出視窗,要求輸入您要測試的應用程式的 apk/ipa/bundle ID。上傳應用程式,選擇要在其上執行測試的裝置,然後單擊執行。
接下來的步驟與 Web 應用的測試用例建立相似。
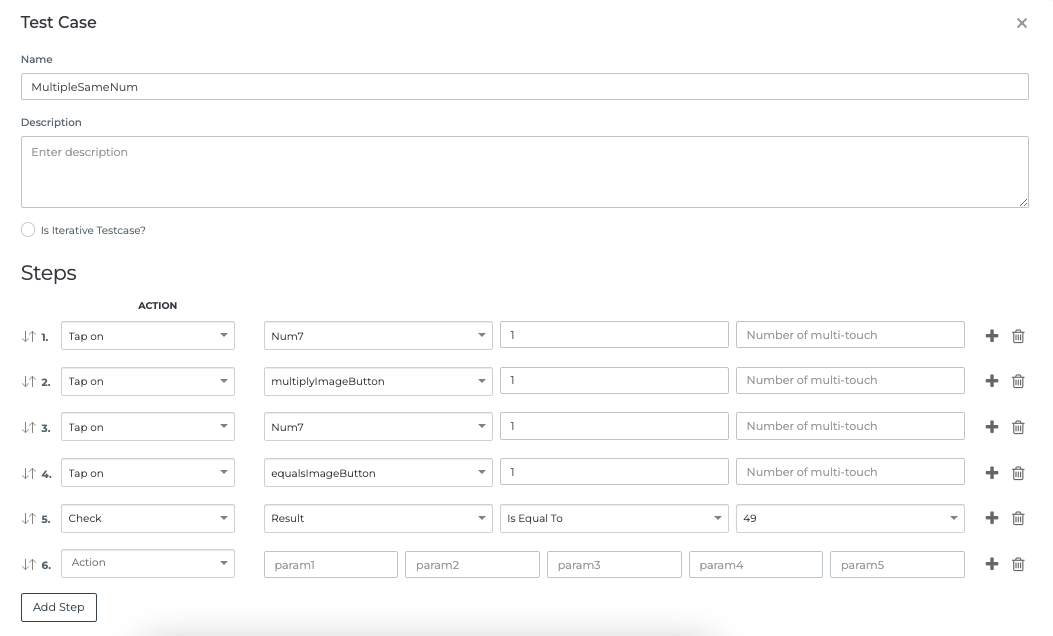
儲存了對兩個數字應用乘法運算並檢查結果的步驟後,將新增測試函式。請注意,您可以直接編寫測試用例,而無需編寫測試函式,就像我們在下面所做的那樣。您可以為跨測試用例重複使用的步驟建立測試函式。這些可以作為公共函式重用。
在您執行測試用例後,選擇要在其上執行測試的構建和裝置。在合併和編譯之後,您可以即時看到執行情況以及生成的日誌。
要檢視有關執行的任何詳細資訊,您可以檢視構建摘要。
與 Web 應用程式類似,您也可以將“錄製和播放”功能用於移動應用程式。
此外,您還可以利用 TestGrid 提供的多種報告和日誌,這些報告和日誌便於分析執行的效能。Insights 功能顯示了與執行相關的各種效能引數的圖形表示,例如 CPU 負載、記憶體使用情況、請求和響應資料大小等。
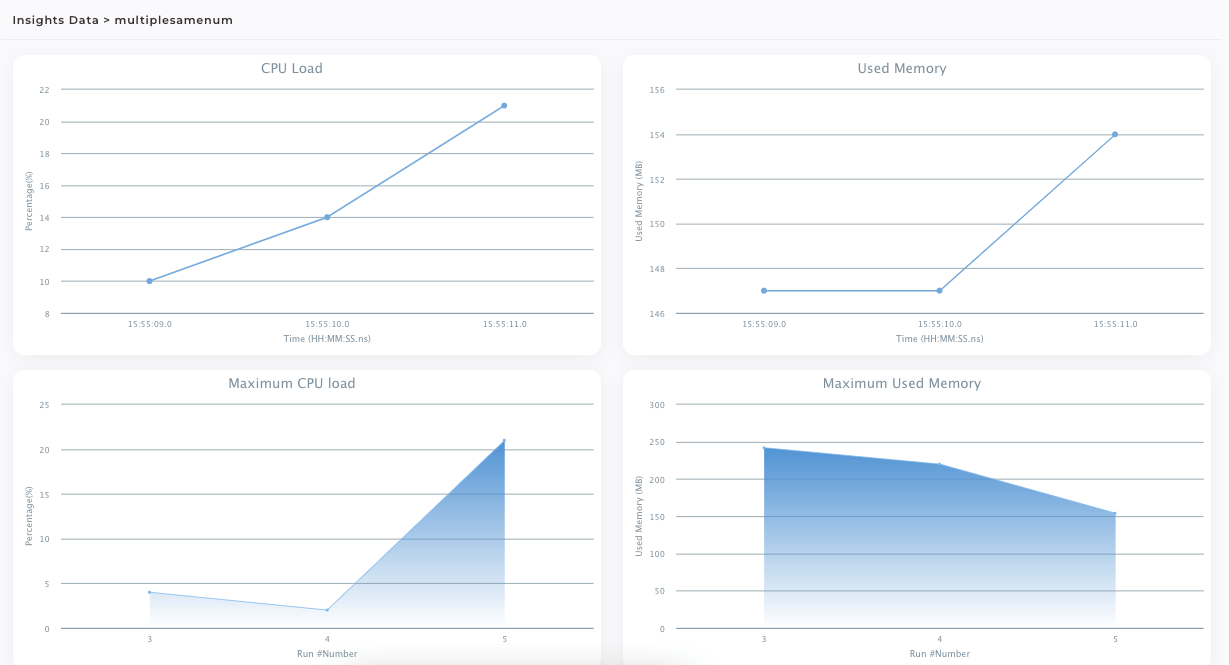
此外,事務分析提供了關於效能基準的各種可下載報告,包括裝置資訊。
本節演示瞭如何利用詳盡的報告、分析和易於執行的功能來擴充套件您的自動化範圍。藉助 TestGrid 的真實裝置雲,您可以將測試覆蓋範圍擴充套件到各種裝置。無論您是擁有成熟的測試框架還是從零開始,TestGrid 都能讓您從上次中斷的地方繼續。
使用 TestGrid 的視覺測試功能
視覺測試超越了功能檢查,可以檢測敏捷開發過程中的視覺迴歸。
TestGrid 透過智慧測試自動化使視覺測試更具可擴充套件性。它使團隊能夠在所有平臺上自動捕獲螢幕截圖,並使用基於 AI 的影像比較來查詢差異。深入的熱圖和指標以及分析儀表板有助於測試團隊自動化 Web 和移動應用程式的視覺驗證。此功能透過確保設計一致性,幫助測試團隊實現出色的使用者體驗。
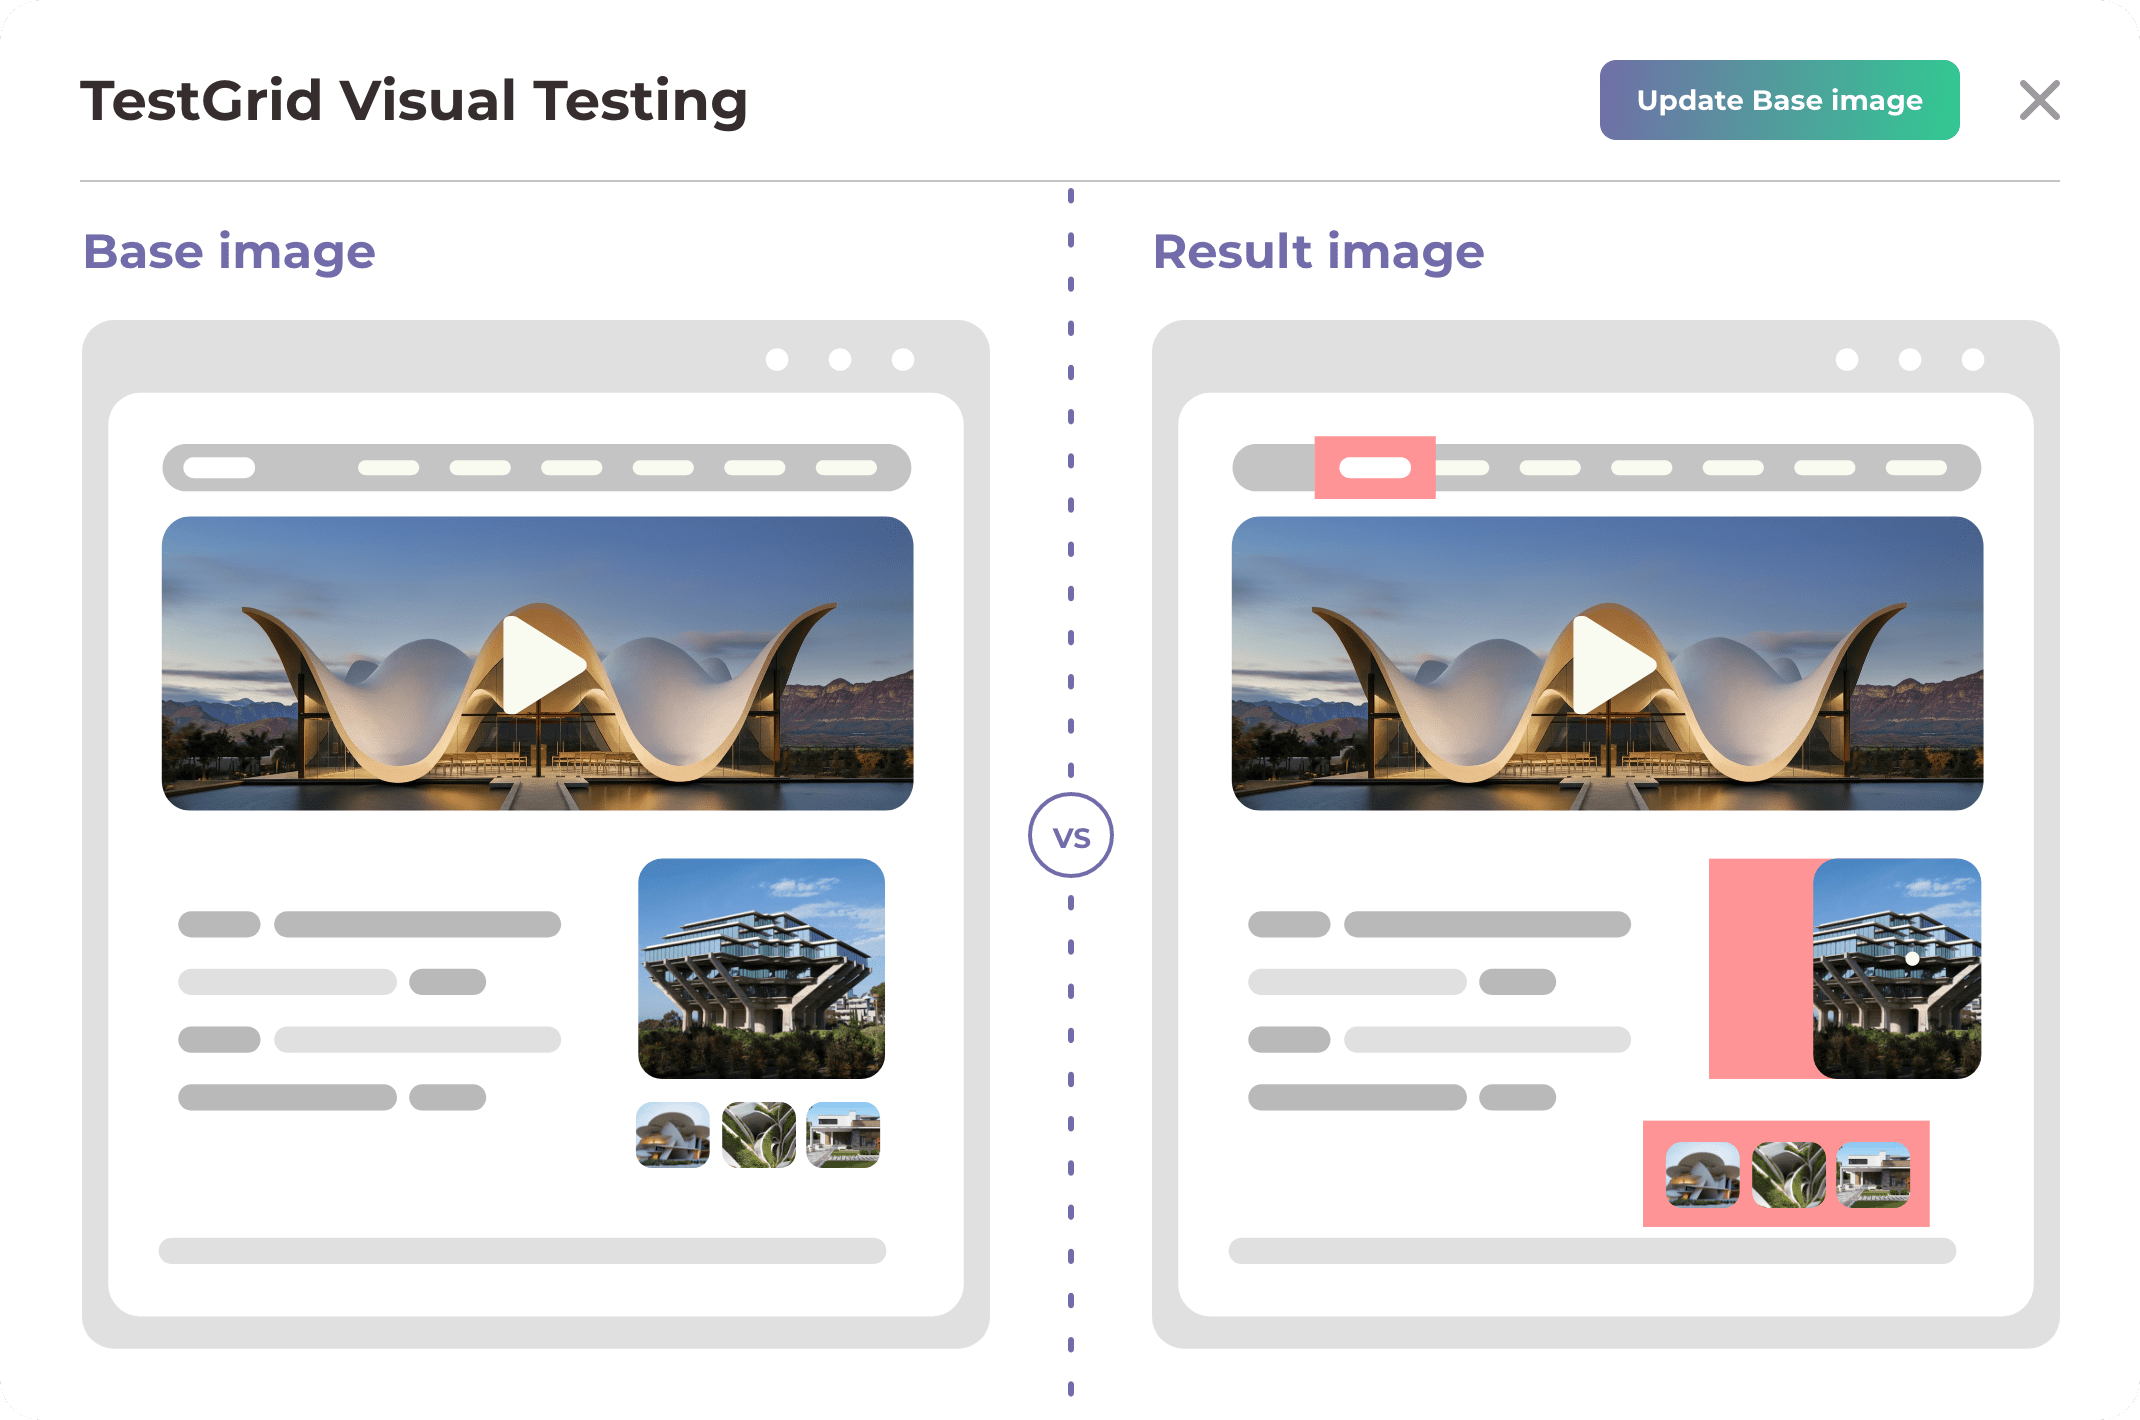
在按照配置視覺測試的步驟在您的 Selenium 或 Appium 程式碼中進行操作後,您可以在選定裝置的自動化會話結果中的視覺測試選項卡中檢視視覺測試結果。
視覺測試在確保任何應用程式的整體質量方面發揮著關鍵作用。徹底測試使用者介面,注重細節,可以提高使用者滿意度和留存率。TestGrid 提供了將視覺測試功能輕鬆整合到現有測試中的能力,從而提供了一種方法來增加被測系統的總體覆蓋範圍。
總結
隨著軟體交付的加速,需要更新測試實踐以保持相關性。現代應用程式需要高質量的基準,而這些基準在傳統的測試自動化方法中是缺乏的。為 Selenium 或 Appium 編寫測試指令碼既複雜又耗時。頻繁的更改使這些指令碼不可靠,並增加了維護開銷。
TestGrid 增強了傳統功能,以提供面向未來的測試自動化。它提供了無程式碼自動化、易於整合以及強大的分析和報告等現代功能。使用計算機視覺和 AI 的無指令碼測試有助於實現規模和穩定性。測試團隊可以輕鬆高效地實現跨瀏覽器、裝置和平臺的測試覆蓋,並在產生任何業務影響之前視覺化 UI 問題。
此帖子由 TestGrid 贊助。TestGrid 是雲端和本地端端到端自動化測試解決方案的領先提供商。TestGrid 專注於簡化測試流程,提供尖端功能,使團隊能夠顯著節省成本和時間,同時加速其上市策略。