
使用 HTML 地標角色改善無障礙性
確保所有使用者都能訪問您的網站非常重要,包括那些使用螢幕閱讀器等輔助技術的使用者。實現這一目標的一種方法是使用 ARIA 地標角色,幫助螢幕閱讀器使用者輕鬆瀏覽您的網站。使用地標角色還有其他好處,例如改進 HTML 的語義並使您的網站更容易進行樣式設定。在這篇博文中,我們將透過一個簡單的示例,更深入地探討這些地標以及如何在您的網站上使用它們。
什麼是 HTML 地標角色?
在 ARIA(Accessible Rich Internet Applications)規範中,地標被定義為頁面中使用者可能希望快速訪問的區域。雖然規範中並未明確指出這專門針對螢幕閱讀器使用者,但他們確實是這些功能特別有用的使用者群體。ARIA 規範中定義了八個地標角色。
bannernavigationsearchmainregioncomplementaryformcontentinfo
為元素分配特定角色的方法之一是使用元素上的 role 屬性。例如:
<div class="banner" role="banner"></div>
雖然在某些情況下您可能需要顯式設定元素的角色,但某些 HTML 元素本身就具有與之關聯的角色。在本文的其餘部分,我們將遵循 ARIA 的第一條規則,即:
如果您可以使用一個具有您所需語義和行為的原生 HTML 元素或屬性,而不是重新利用一個元素並新增 ARIA 角色、狀態或屬性來使其可訪問,那麼請這樣做。
如何使用地標角色
為了說明 HTML 地標的工作原理,我們將構建一個基本的網頁,以改善螢幕閱讀器使用者在頁面上的使用者體驗和可訪問性。我們不會編寫任何 CSS,而是專注於編寫乾淨、語義化的 HTML。
將以下 HTML 儲存到名為 index.html 的檔案中,並在您喜歡的瀏覽器中開啟它。
<!doctype html>
<html lang="en">
  <head>
    <meta charset="UTF-8" />
    <meta name="viewport" content="width=device-width, initial-scale=1.0" />
    <meta http-equiv="X-UA-Compatible" content="ie=edge" />
    <title>Mr. Pineapple's Pizzeria</title>
  </head>
  <body></body>
</html>
您應該會看到一個空白頁面,瀏覽器標籤頁中顯示標題“Mr. Pineapple's Pizzeria”。對於每個地標,我們將新增相應的 HTML 並檢查可訪問性樹,以檢視其變化。
橫幅地標
橫幅地標用於標識網頁的頭部,通常包含網站的徽標、導航和搜尋輸入。當 <header> 元素未用作 <main> 元素或其他分節元素的子元素時,它會被分配 banner 角色。
讓我們透過向我們的頁面新增一個橫幅地標來看看效果。
<body>
  <header>
    <a class="logo" href="/">
      <span class="visually-hidden">Mr. Pineapple's Pizzeria</span>
    </a>
  </header>
</body>
重新整理頁面並開啟開發人員工具。您訪問可訪問性樹的方式將因瀏覽器而異。您可以按照下面的連結獲取更多資訊:
- Firefox
- Chromium(Edge、Chrome、Arc)
- 在 Safari 中,開啟 開發人員工具(稱為 Web Inspector)。在元素選項卡中選擇一個元素。在最右側,選擇節點選項卡並展開可訪問性部分。

從螢幕截圖中可以看到,當選中 <header> 元素時,角色顯示為 banner。我們有個不錯的開端!
注意:Firefox 開發人員工具的可訪問性檢查器將不會顯示元素的適當角色。相反,它會將所有這些元素的角色顯示為“landmark”。此問題已得到解決,並將整合到 Firefox 114 中。如果您使用的是Firefox for developers,該問題將已解決。
導航地標
navigation 地標用於標識一組連結,這些連結可幫助使用者導航網頁或相關網頁。這可以包括側邊欄導航、站點主導航或頁面頁尾中的一組相關連結。
如前所述,頁面頭部中常見的元素之一是站點的初級導航。讓我們為我們的頁面新增一個:
<nav aria-label="Primary">
  <ul>
    <li><a aria-current="page" href="/">Home</a></li>
    <li><a href="/menu">Our pizzas</a></li>
    <li><a href="/contact">Get in touch</a></li>
  </ul>
</nav>
在這裡,我們使用 <nav> 元素,因為它隱含地具有 navigation 角色。由於一個頁面可能包含多個導航元素,因此為每個地標進行唯一標識非常重要。為此,我們使用 aria-label 屬性,併為導航地標命名為“Primary”。
注意:當螢幕閱讀器描述上述導航地標時,它將說“Primary navigation”。這就是為什麼“navigation”一詞不包含在
aria-label值中的原因。
如果您檢查 <nav> 元素,您會注意到兩件事:該元素被標識為導航地標,並暴露了我們使用 aria-label 指定的值。

搜尋地標
search 角色用於對一組相關元素進行分組,這些元素共同提供了一種搜尋網站的方法。使用此角色的最常見方式是透過表單。
<form name="site-search" action="/search" method="get" role="search">
  <label for="query">Find your perfect pizza</label>
  <input type="search" id="query" name="query" />
</form>
在這裡,我們遇到了第一個需要顯式分配角色的例項。由於沒有具有隱式搜尋角色的原生 HTML 元素,因此在此示例中我們將角色分配給 <form> 元素。隨著新 HTML 元素的引入,這一點將發生改變,我們將在本文稍後討論。
如果您使用開發人員工具檢查表單元素,您會發現它正確地將地標標識為搜尋地標。

主內容地標
現在我們離開頭部,進入頁面主內容。這將引入下一個地標,恰當地命名為 main。重要的是要注意,一個頁面只能有一個 <main> 元素。
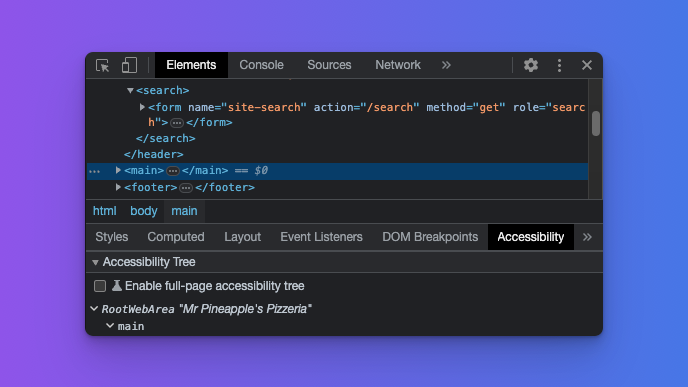
在開發人員工具中選擇 <main> 元素現在將正確標識我們的主內容。
區域地標
我們的主內容可以由不同型別的內容或區域組成,而幸運的是,有一個角色可以實現這一點。region 角色是一個有趣的角色;技術上存在一個具有隱式 region 角色的 HTML 元素,但該元素本身卻存在一些爭議。
我所說的元素是 <section> 元素,或者有些人稱之為另一個名稱的 <div>。爭議的原因是,當像下面的示例那樣使用時,它沒有任何語義意義。
<section>
  <h2>Our pizzas</h2>
  <ul>
    <li>Margherita with pineapple</li>
    <li>Veggie with pineapple</li>
    <li>Meaty with pineapple</li>
  </ul>
</section>
使用開發人員工具對其進行檢查也將表明它未被標識為區域導航地標。
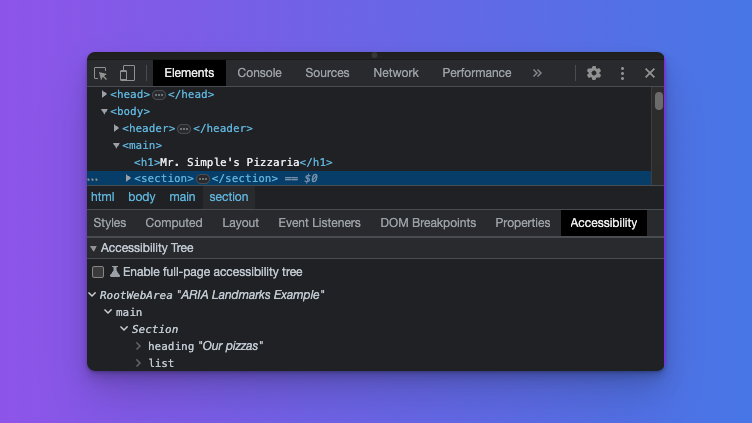
那麼,我們如何將其轉換為區域呢?我們可以透過使用 aria-labelledby 屬性將標題元素與 section 關聯起來。這有兩個目的:它將 section 轉換為區域導航地標,然後標題為該區域提供唯一的名稱。
在極少數情況下,當沒有要與 <section> 元素關聯的標題時,您也可以使用 aria-label 屬性來實現相同的結果。讓我們更新之前的程式碼來實現這一點:
<section aria-labelledby="our-pizzas-heading">
  <h2 id="our-pizzas-heading">Our pizzas</h2>
  <p>
    All our pizzas come with the best pizza topping in the world. Pineapple!
  </p>
  <ul>
    <li>Margherita with pineapple</li>
    <li>Veggie with pineapple</li>
    <li>Meaty with pineapple</li>
  </ul>
</section>
當您現在檢查 <section> 元素時,它將被正確標識為區域地標,並顯示從標題元素繼承的名稱。

此時,重申使用地標的原因很重要。地標旨在標識使用者最可能感興趣並希望導航到的頁面的關鍵區域。因此,在決定突出顯示頁面的哪些區域作為地標時要謹慎。
補充地標
complementary 地標旨在標識與主內容互補的內容,同時在與主內容分離時仍然有意義。這可以包括相關文章、放映時間或天氣資訊。對於我們的頁面,我們將連結到一些很棒的比薩食譜。
這次,我們確實有一個可以用於補充地標的原生 HTML 元素。
<aside aria-labelledby="pizza-recipe-heading">
  <h3 id="pizza-recipe-heading">Make your own pie!</h3>
  <p>Below is a list of our favorite pizza recipes.</p>
  <ul>
    <li><a href="/mushroom-pizza">The shroom</a></li>
    <li><a href="/smokey-joe">Smokey Joe</a></li>
    <li><a href="/fromage">Fromage</a></li>
  </ul>
</aside>
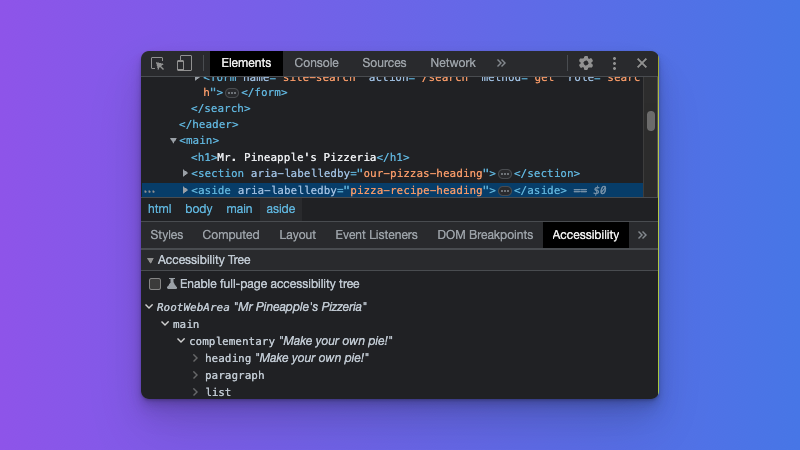
<aside> 元素具有補充的隱式角色,因此是滿足我們需求的理想選擇。由於一個頁面可以有多個補充區域,因此為每個區域命名並確保其唯一且描述性很重要。我們可以透過將標題元素與 aria-labelledby 屬性關聯,或在 <aside> 元素上使用 aria-label 來實現這一點。
在開發人員工具中檢查該元素將顯示它被標識為補充導航地標角色,並從關聯的標題元素繼承其名稱。
表單地標
乍一看,這似乎顯而易見,如果不是因為一個重要的細微差別,這與我們之前討論的 <section> 元素的情況類似。讓我們為我們的頁面新增一個新聞通訊訂閱表單。
<div class="newsletter">
  <h3>Subscribe to Mr. Pineapple's newsletter</h3>
  <p>
    In our newsletter, you can expect even more wonderful pizza recipes, all
    featuring the versatile pineapple.
  </p>
  <form name="newsletter" action="/subscribe" type="post">
    <label for="email">Please provide your email address</label>
    <input type="email" id="email" name="email" />

    <button type="submit">Pineapple Me 🍍</button>
  </form>
</div>
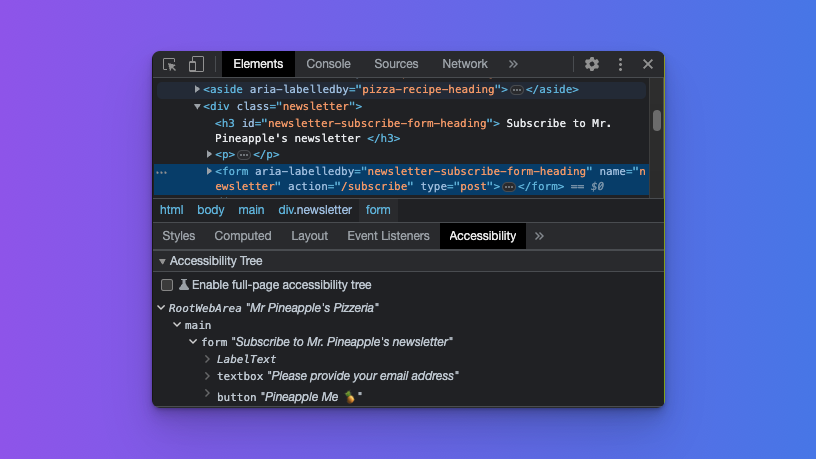
如果您檢查 <form> 元素,您可能會失望地發現它未被標識為表單地標,而是被標識為通用區域。
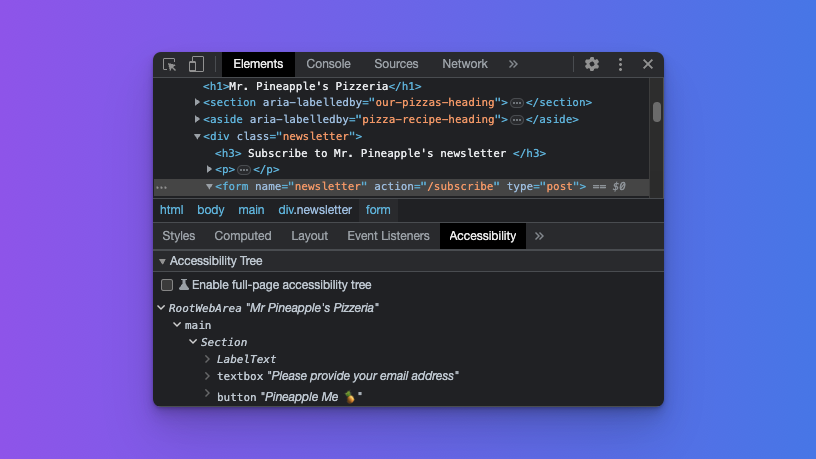
這是怎麼回事?與之前的 <section> 元素一樣,您需要將標題元素與表單關聯,或使用 aria-label 屬性。我們已經有一個描述性的標題,所以我們只需要將標題與表單關聯起來。
<div class="newsletter">
  <h3 id="newsletter-subscribe-form-heading">
    Subscribe to Mr. Pineapple's newsletter
  </h3>
  <p>
    In our newsletter, you can expect even more wonderful pizza recipes, all
    featuring the versatile pineapple.
  </p>
  <form
    aria-labelledby="newsletter-subscribe-form-heading"
    name="newsletter"
    action="/subscribe"
    type="post">
    <label for="email">Please provide your email address</label>
    <input type="email" id="email" name="email" />

    <button type="submit">Pineapple Me 🍍</button>
  </form>
</div>
完成這些更改後,檢查表單元素將得出預期的結果。
內容資訊地標
contentinfo 地標用於標識有關網頁的資訊,例如版權資訊或隱私宣告連結。最常見的用途是頁面頁尾。在這裡又一次,我們有一個原生 HTML 元素可以提供幫助。
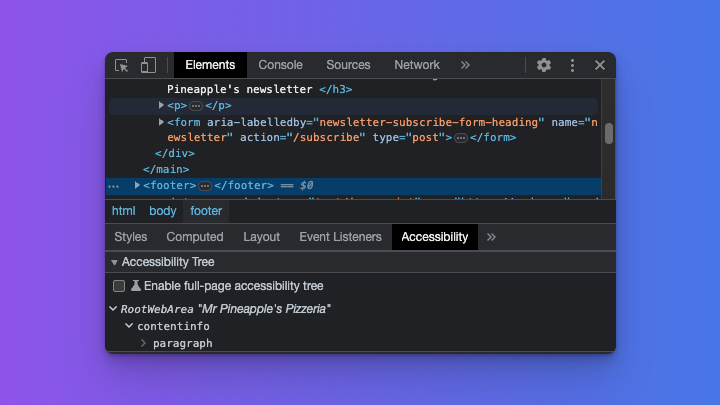
<footer>
<p>Copyright © Mr. Pineapple's Pizzeria - 2023</p>
</footer>
與 <header> 元素一樣,重要的是 <footer> 元素不位於 <main> 元素或另一個分節元素內部。如果這樣做,它將不會具有 contentinfo 的隱式角色。考慮到我們的 <footer> 元素是 <body> 元素的直接子元素,在開發人員工具中檢查它將得出預期的結果。
一個新的搜尋 HTML 元素
現在我們已經涵蓋了所有地標角色,並且對於每個地標,我們都有一個可以使用的原生 HTML 元素。是的,我們為 region 和 form 地標做了一些額外的工作,但我們從未顯式使用 role 屬性。
但等等,搜尋地標呢?我們不得不在表單上使用 role 屬性。該死,你抓到我了!但我在文章後面提到了會給你一個驚喜。需要顯式為表單分配 search 角色的日子正在隨著新的 <search> 元素的引入而結束。那麼,我們如何使用它呢?讓我們更新我們之前的搜尋地標以使用新元素:
<search>
  <form name="site-search" action="/search" method="get" role="search">
    <label for="query">Find your perfect pizza</label>
    <input type="search" id="query" name="query" />
  </form>
</search>
然而,這就像走在最前沿一樣,所以如果您今天(2023 年初)檢查 <search> 元素,您會發現它在可訪問性樹中顯示為“ignored”。

這就是為什麼我保留了巢狀 <form> 元素上的 role 屬性。一旦瀏覽器和螢幕閱讀器開始實現 <search> 元素,表單上的 role 屬性將不再需要。曾經,<main> 元素也面臨著同樣的問題,主要是由於 Internet Explorer 支援不足,因此需要顯式地為元素新增 role="main"。
現在我們可以退一步,看看我們一起構建的光榮的可訪問性樹。
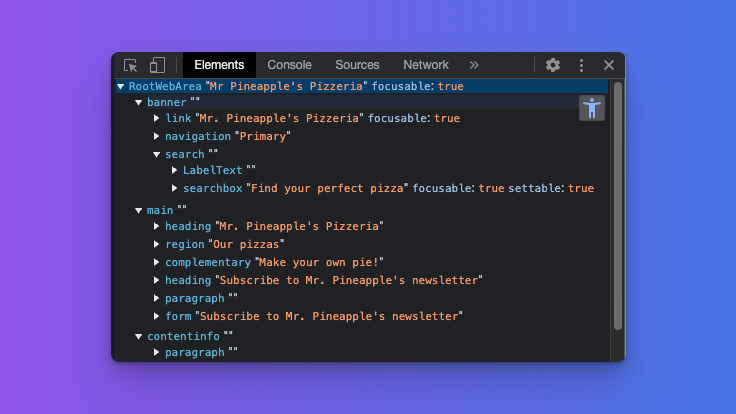
它很美,不是嗎?
在 Chrome 中啟用完整可訪問性樹
請注意,顯示此樹是 Chromium 瀏覽器中的一項實驗性功能。選中開發人員工具中的可訪問性選項卡後,您應該會看到一個條目,寫著“Enable fullpage accessibility tree”,左側有一個未選中的複選框。
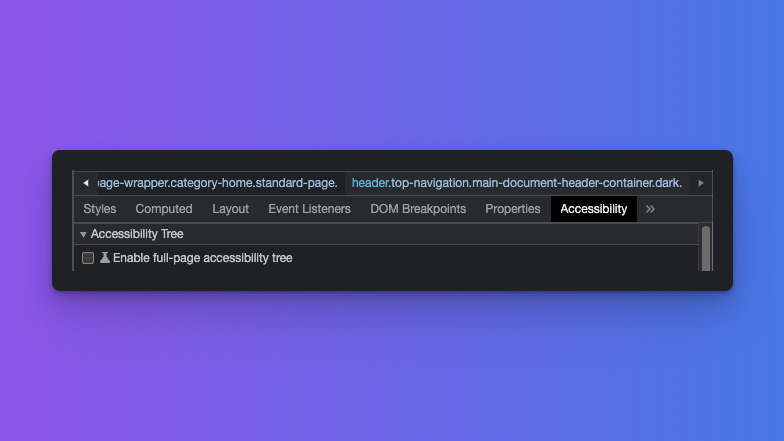
選中該複選框後,將顯示一個通知,要求您重新載入 DevTools。單擊按鈕並重新載入 DevTools 後,您將在 Elements 面板的右上角看到一個新圖示。單擊此圖示將顯示完整的可訪問性樹。
使用螢幕閱讀器演示地標
總而言之,讓我們看看我們的地標如何與螢幕閱讀器配合使用。
- 觀看來自 Mozilla Developer 的影片,其中展示了螢幕閱讀器使用者如何使用我們的地標進行導航。
- 檢視此帖子的 CodeSandbox,以在最終形式中嘗試我們上面建立的頁面。
總結
HTML 地標是使網頁對螢幕閱讀器使用者更具可訪問性的重要工具。透過在網頁上定義地標,您可以幫助使用者更輕鬆地導航並快速找到他們所需的資訊。請記住,在可能的情況下使用適當的 HTML 元素,並清楚地標記您的地標,以便使用者知道它們的作用。